As many customers look into migrating their SAP solutions into AWS, they may also want to convert existing network file shares (NFS) shares for /sapmnt or /usr/sap/<SID> file systems into elastic file system (EFS) shares. EFS shares are hosted as cloud file storage that can be managed the same as any local file system. In this case any data that is placed in an EFS share will have much higher protection due to the high availability and durability provided.
Steps for Converting an Existing SAP Hierarchy using NFS to EFS
Companies who are currently using SIOS LifeKeeper for Linux clusters to protect SAP on premises can easily convert their SAP hierarchy from NFS to EFS using the following straightforward steps. The process should only take about 20 minutes.
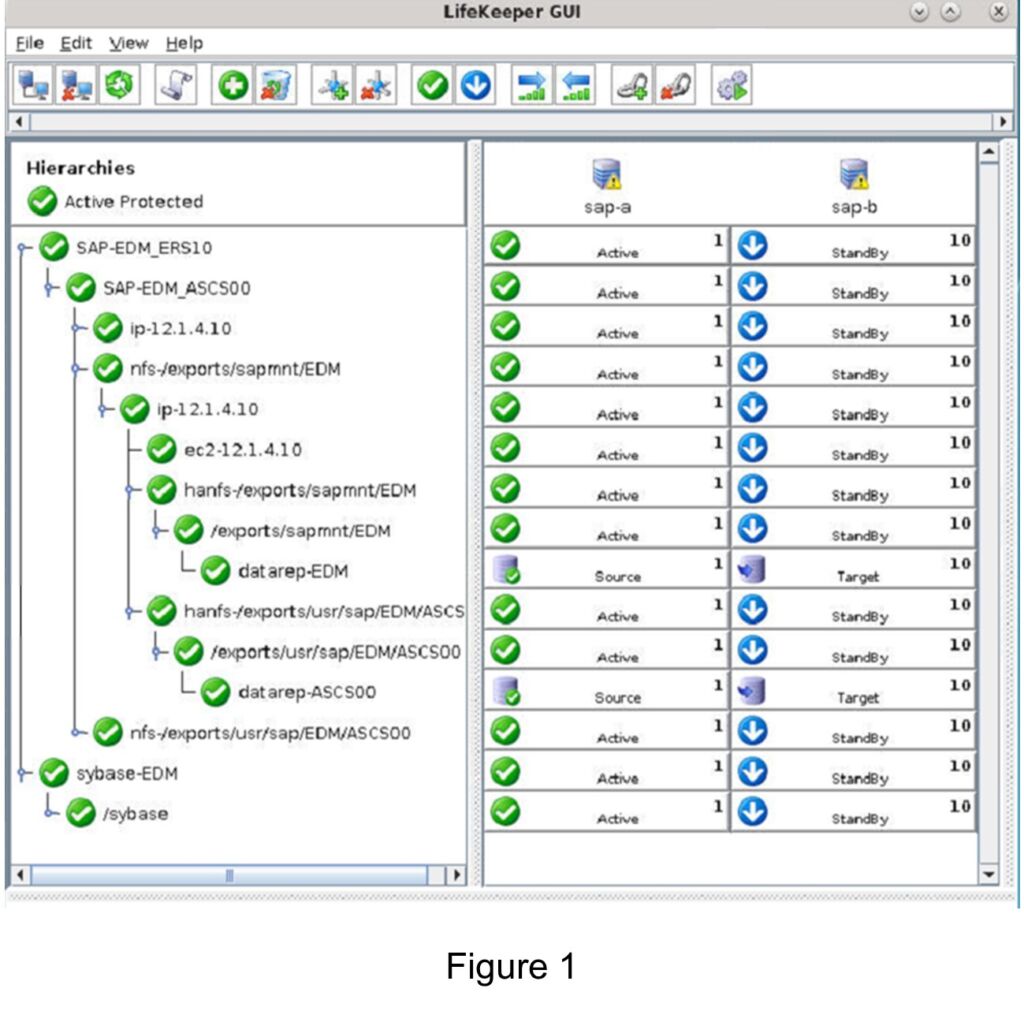
In this example, the SIOS LifeKeeper Linux solution is protecting an NFS export share /exports/sapmnt/EDM with local mount point /sapmnt/EDM (i.e. 12.1.4.10:/exports/sapmnt/EDM /sapmnt/EDM) (Figure 1).
- Create the EFS share reference: https://docs.aws.amazon.com/efs/latest/ug/gs-step-two-create-efs-resources.html
- Make sure to update the security group to the one your instances are using, this has to be done to be able to mount.
- IP address of filesystem can be found under the networking tab.
- Mount the EFS share on the primary (ISP) node to a temporary location (i.e. /sapmnttmp)
- mount -t nfs4 -o nfsvers=4.1,rsize=1048576,wsize=1048576,hard,timeo=600,retrans=2,noresvport <ipaddress-filesystem>:/ /sapmnttmp
- Add SAP_NFS_CHECK_IGNORE=1 to the /etc/default/LifeKeeper on both nodes
At this point there are mounted entries for the EFS filesystem. Before this check is set LifeKeeper is checking the NFS mounts that have already been there, Since, we know that we have mounted an efs filesystem it is safe to enable this check to ignore the nfs warning due to this new fiesystem being currently unrecognizable.
- Use LifeKeeper lkbackup tool to create a backup copy of the LifeKeeper configuration
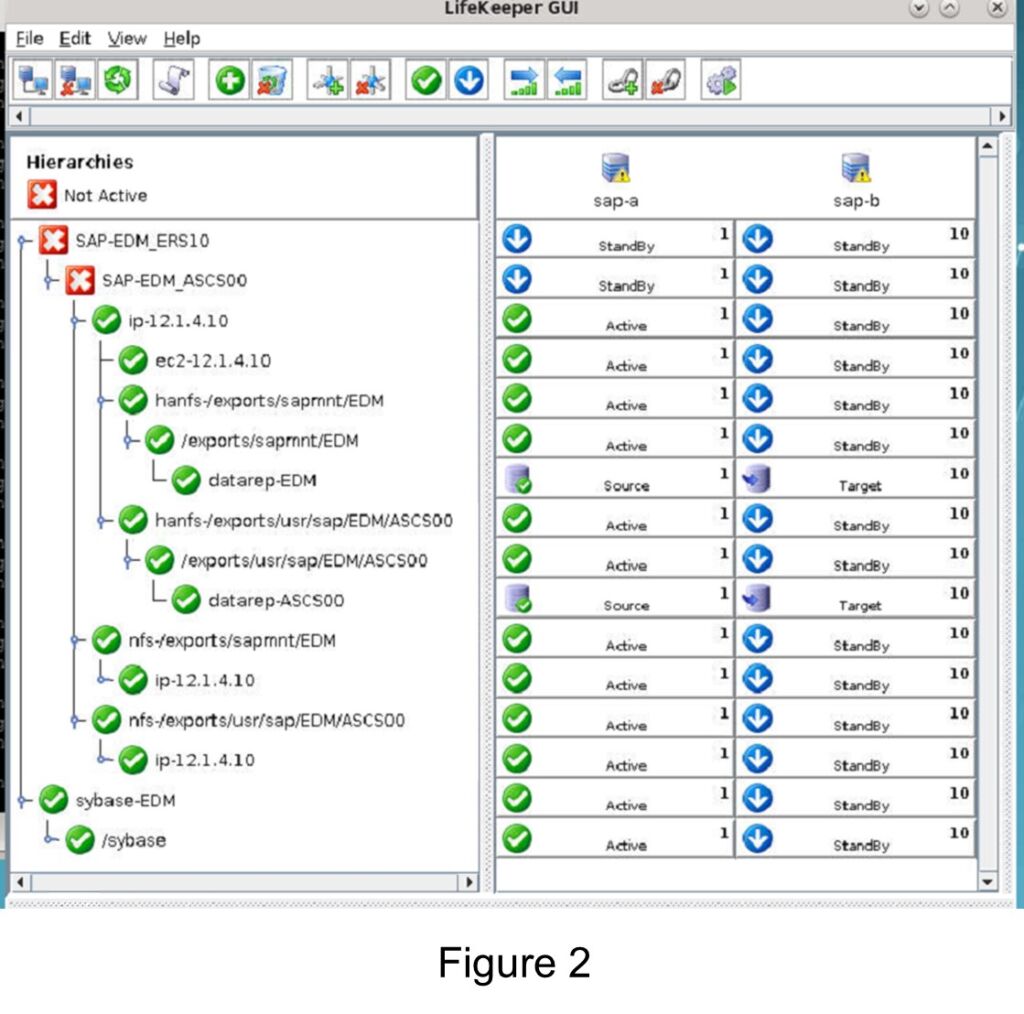
a. /opt/LifeKeeper/bin/lkbackup -c -n - Use LifeKeeper GUI or CLI to stop the SAP resources (perform an Out-of-Service) (Figure 2)
a. /opt/LifeKeeper/bin/perform_action -t SAP-EDM_ASCS00 -a remove
a. lsof -c sap
i. kill <pid>
7. Copy NFS data from the NFS export to the new EFS location
a. cp -pra /exports/sapmnt /sapmnttmp
b. cp -pra /exports/usr/sap/EDM/ASCS00 /sapmnttmp
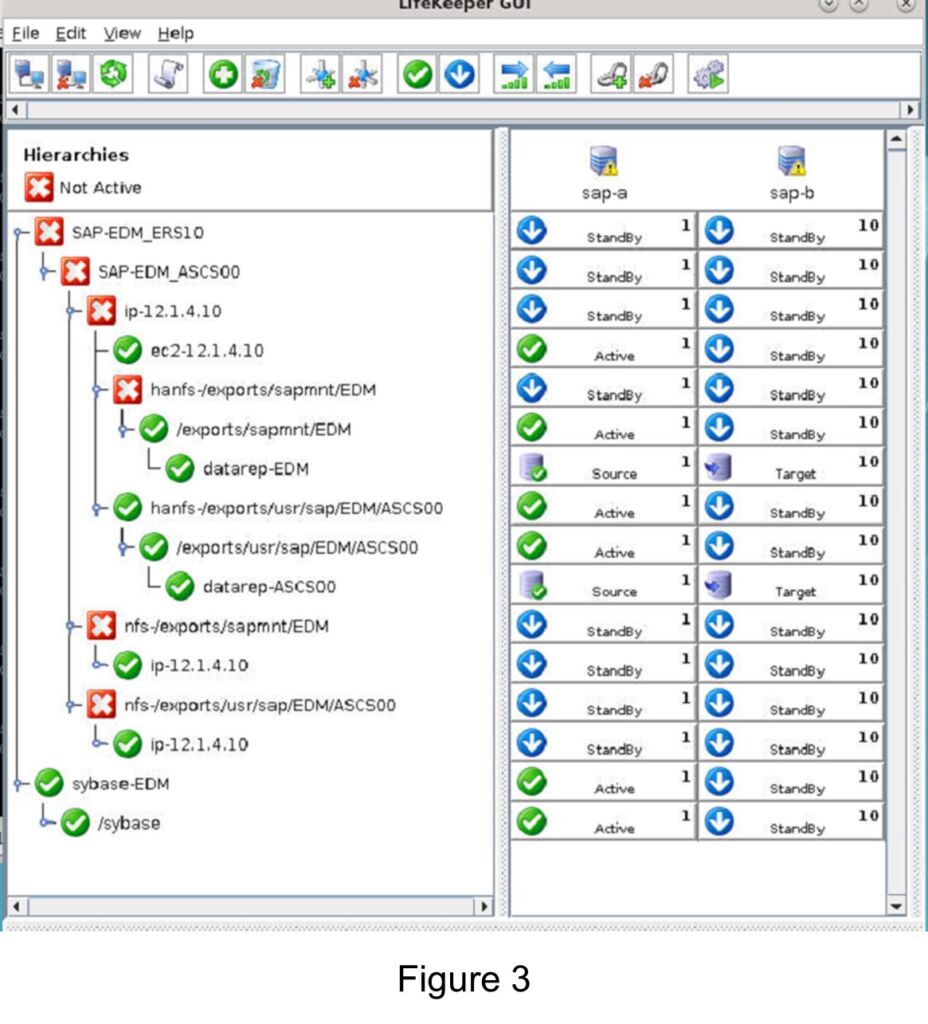
8. Take hanfs resources osu
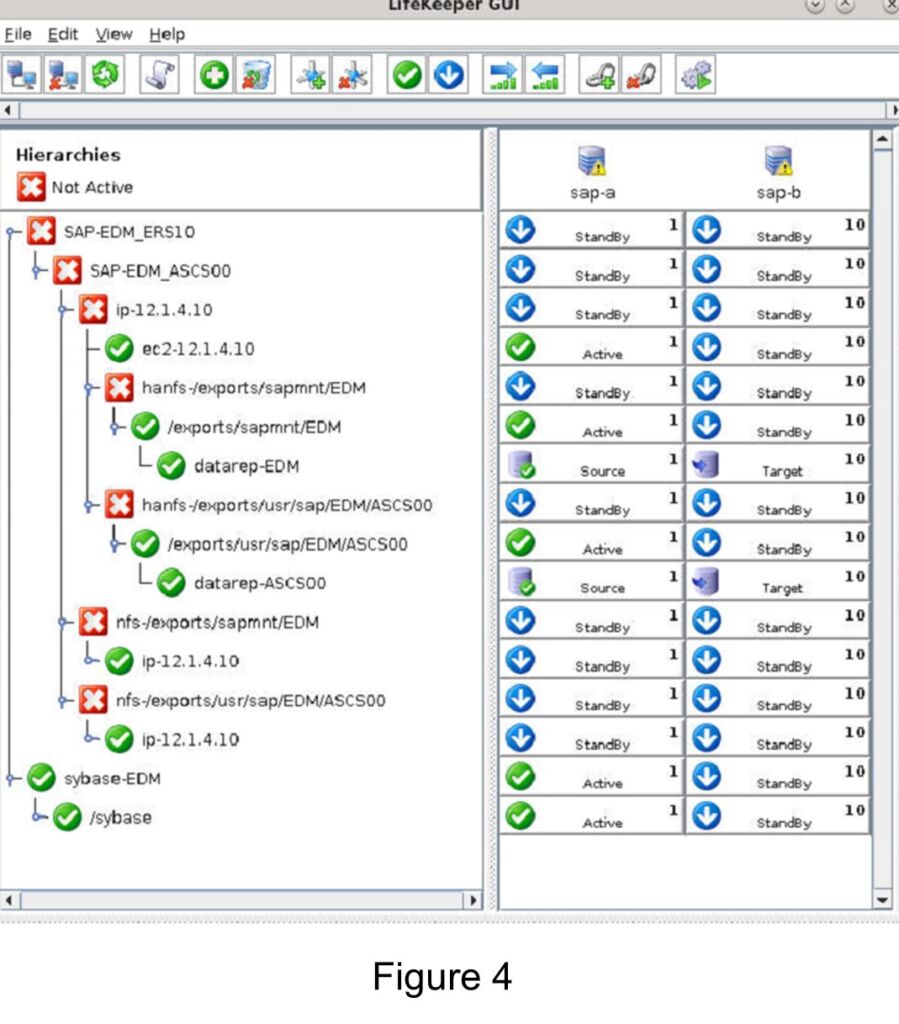
a. /opt/LifeKeeper/bin/perform_action -t hanfs-/exports/sapmnt/EDM -a remove (Figure 3)
a. umount/exports/sapmnt/EDM
b. umount /exports/usr/sap/EDM/ASCS00
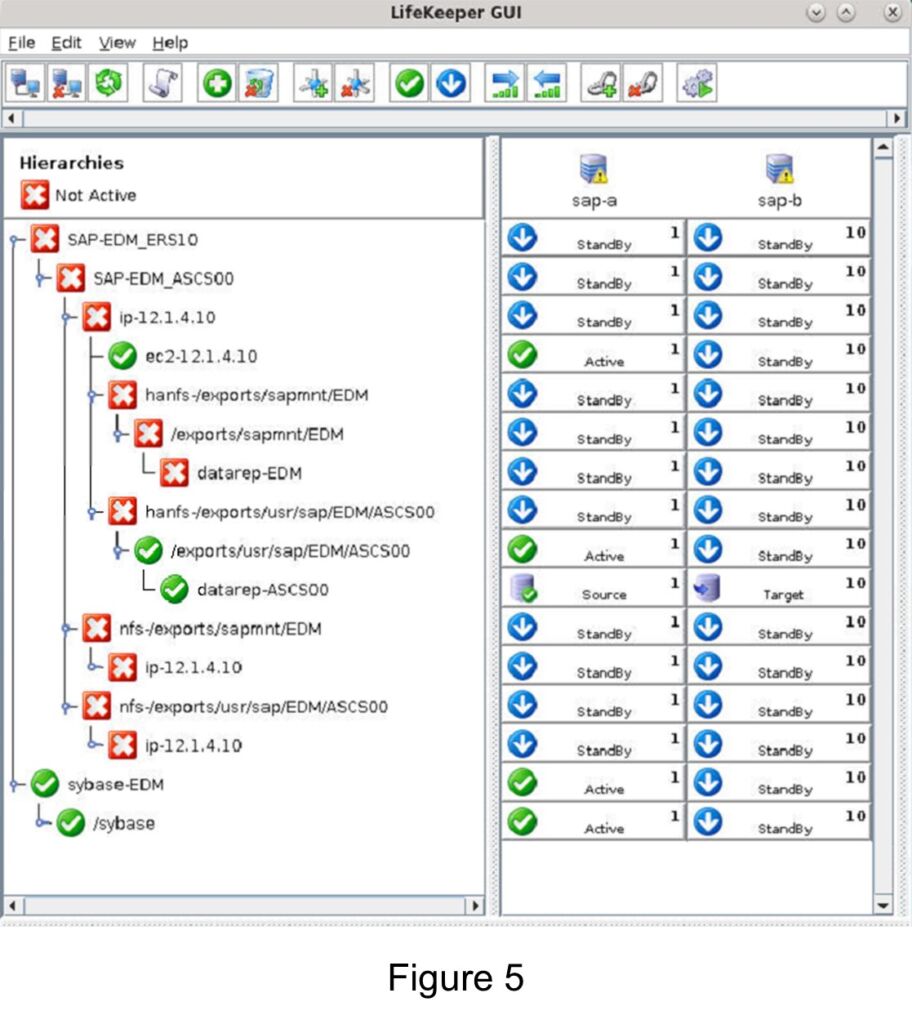
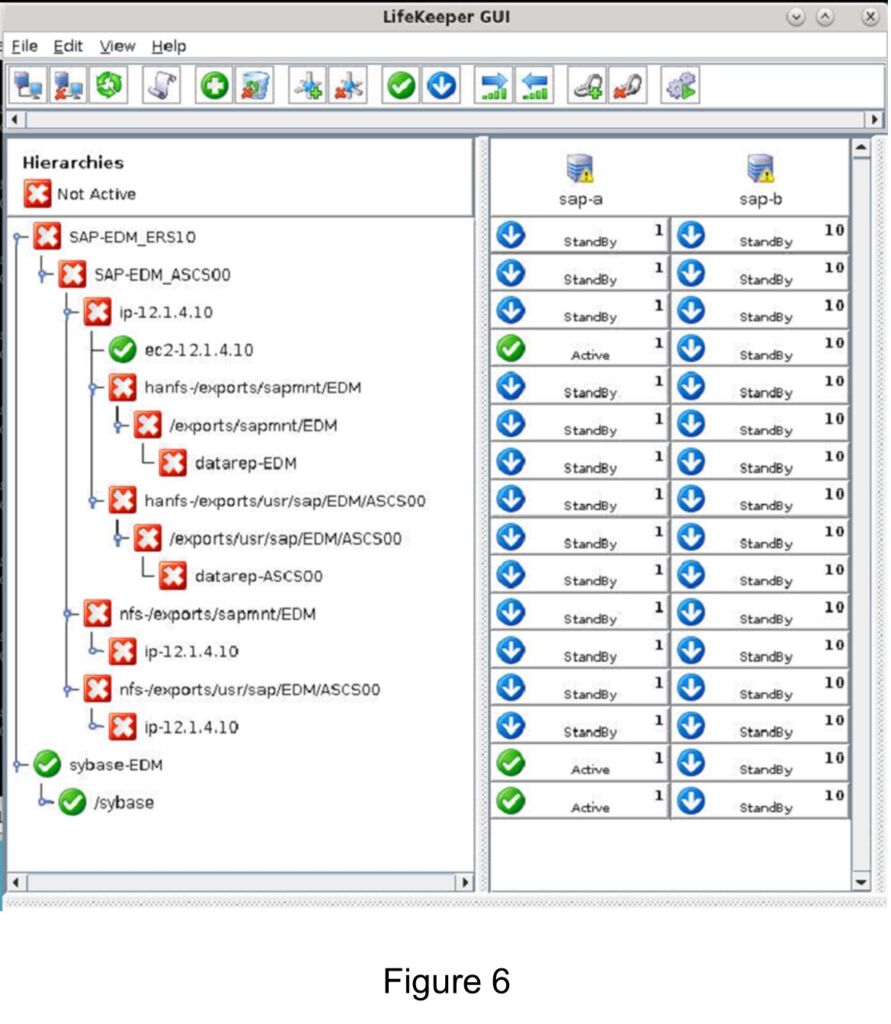
10. Use LifeKeeper GUI or CLI to take associated datarep-sapmnt resources OSU
a. /opt/LifeKeeper/bin/perform_action -t datarep-EDM -a remove (Figure 5)
/opt/LifeKeeper/bin/perform_action -t datarep-ASCS00 -a remove (Figure 6)
- Add mount entries for EFS into /etc/fstab on node 1
a. Replace sap exports mounts with efs
i. :/sapmnt/EDM /sapmnt/EDM nfs nfsvers=4.1,rsize=1048576,wsize=1048576,hard,timeo=600,retrans=2,noresvport 0 0
ii. :/ASCS00 /usr/sap/EDM/ASCS00 nfs nfsvers=4.1,rsize=1048576,wsize=1048576,hard,timeo=600,retrans=2,noresvport 0 0 - Use the umount command to unmount the temporary /sapmnttmp mount point on node 1
a. umount /sapmnttmp - Unmount the sap mounts
a. umount -l /sapmnt/EDM
b. umount -l /usr/sap/EDM/ASCS00 - Use mount command to remount EFS file systems on node 1
a. mount -t nfs4 -o nfsvers=4.1,rsize=1048576,wsize=1048576,hard,timeo=600,retrans=2,noresvport :/sapmnt/EDM /sapmnt/EDM
b. mount -t nfs4 -o nfsvers=4.1,rsize=1048576,wsize=1048576,hard,timeo=600,retrans=2,noresvport :/ASCS00 /usr/sap/EDM/ASCS00
Now you are ready to delete the dependency between the SAP resources and the old SIOS HANFS and NFS resources. - Use GUI to delete the dependencies between SAP resources and HANFS and NFS resources
a. Delete the nfs-/exports/dependencies from SAP-EDM_ASCS00
b. Delete the hanfs-/ child dependencies from ip-12.1.4.10
c. Delete the child dependency, ip-12.1.4.10, from nfs-/export/ filesystems
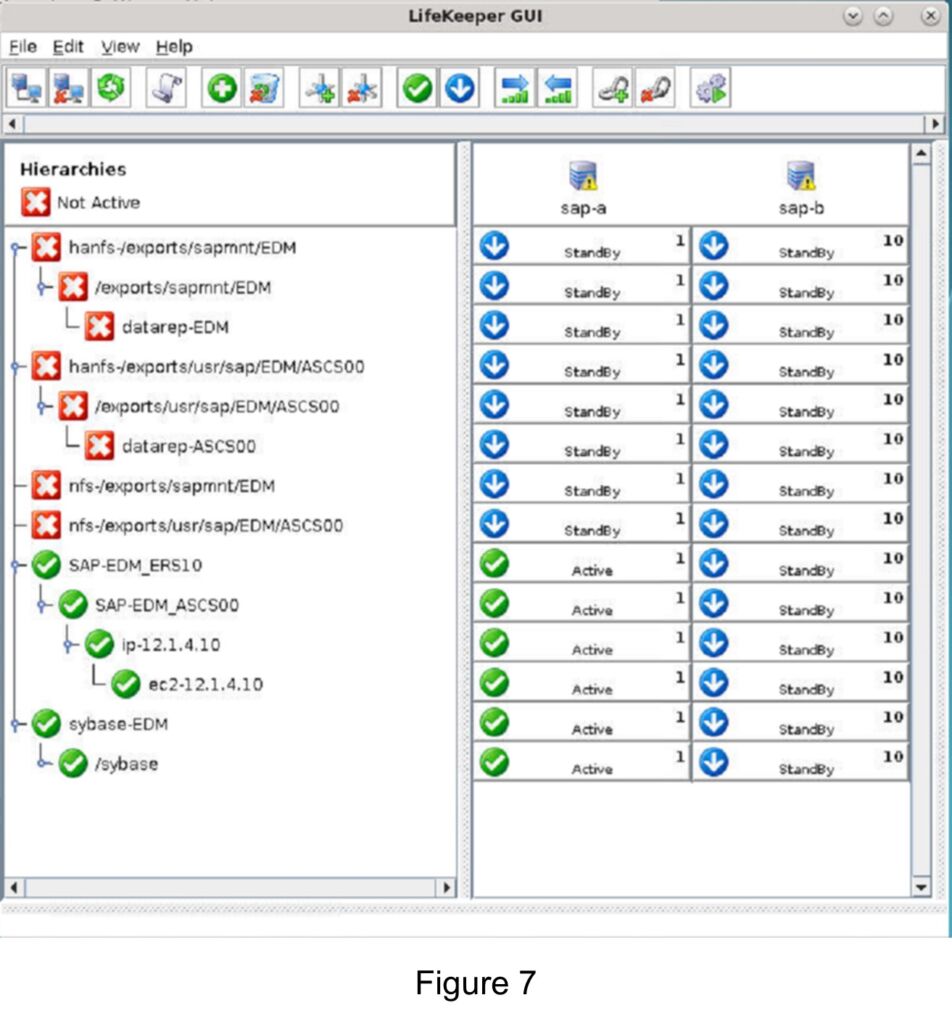
d. Use LifeKeeper GUI or CLI to start the SAP resources (bring the SAP resource in-service)
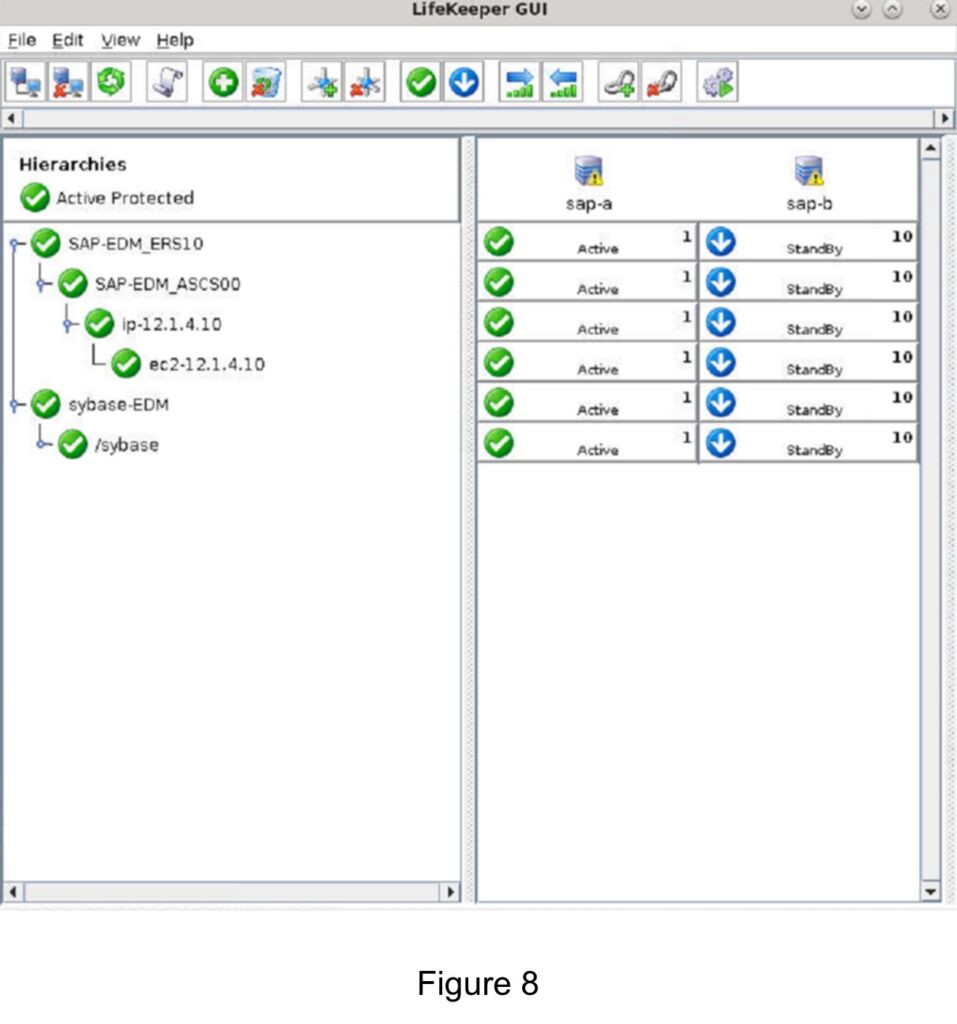
e. The new hierarchies will look similar to the following (Figure 7):
- Add mount entries for EFS into /etc/fstab on node 2.
a. :/sapmnt/EDM /sapmnt/EDM nfs nfsvers=4.1,rsize=1048576,wsize=1048576,hard,timeo=600,retrans=2,noresvport 0 0
b. :/ASCS00 /usr/sap/EDM/ASCS00 nfs nfsvers=4.1,rsize=1048576,wsize=1048576,hard,timeo=600,retrans=2,noresvport 0 0 - Use mount command to remount EFS file systems on node 2, refer to step 13 before adding entries.
a. mount -t nfs4 -o nfsvers=4.1,rsize=1048576,wsize=1048576,hard,timeo=600,retrans=2,noresvport 10.0.147.83:/sapmnt /sapmnt
b. mount -t nfs4 -o nfsvers=4.1,rsize=1048576,wsize=1048576,hard,timeo=600,retrans=2,noresvport 10.0.147.83:/ASCS00 /usr/sap/EDM/ASCS00 - Verify SAP resources are started properly including IP and EC2 resources
- Use the LK GUI to perform a switchover to the target (or standby node)
- Done
Conclusion
Converting an NFS filesystem to EFS is a sure-fire way to provide much more protection to your data and take advantage of AWS cloud resources. It also simplifies the resource hierarchies making your filesystems easier to read and manage. The steps provided above will enable a much faster and smoother transition of your data stored in the cloud.


