Introduction: How to Ensure HA and DR in Your Database
Creating a highly available SAP HANA environment in AWS is a critical task for many businesses. This guide provides a detailed walkthrough for setting up a 3-node HANA System Replication (HSR) cluster using SIOS LifeKeeper in AWS, ensuring database resilience and high availability.
Prerequisites
- AWS account with the ability to deploy EC2 instances.
- SIOS LifeKeeper software
- SIOS LifeKeeper evaluation or permanent license
- SAP HANA software
- Familiarity with AWS services and SAP HANA.
Step 1: Preparing Your AWS Environment
EC2 Instance Deployment
Deploy three EC2 instances in AWS. These instances will act as your HANA cluster’s primary, secondary, and tertiary nodes. Ensure they meet the hardware and software requirements for SAP HANA and SIOS LifeKeeper. Make sure you follow the SAP HANA sizing guidelines when building your instance.
Network Configuration
Configure your VPC, subnets, and security groups to allow communication between the nodes and to enable access to necessary services.
When configuring HANA nodes in different regions, you can protect the DNS name using the SIOS LifeKeeper for Linux Route53 Application Recovery Kit or ARK. Following is the architecture for a 3 node HANA database in AWS:
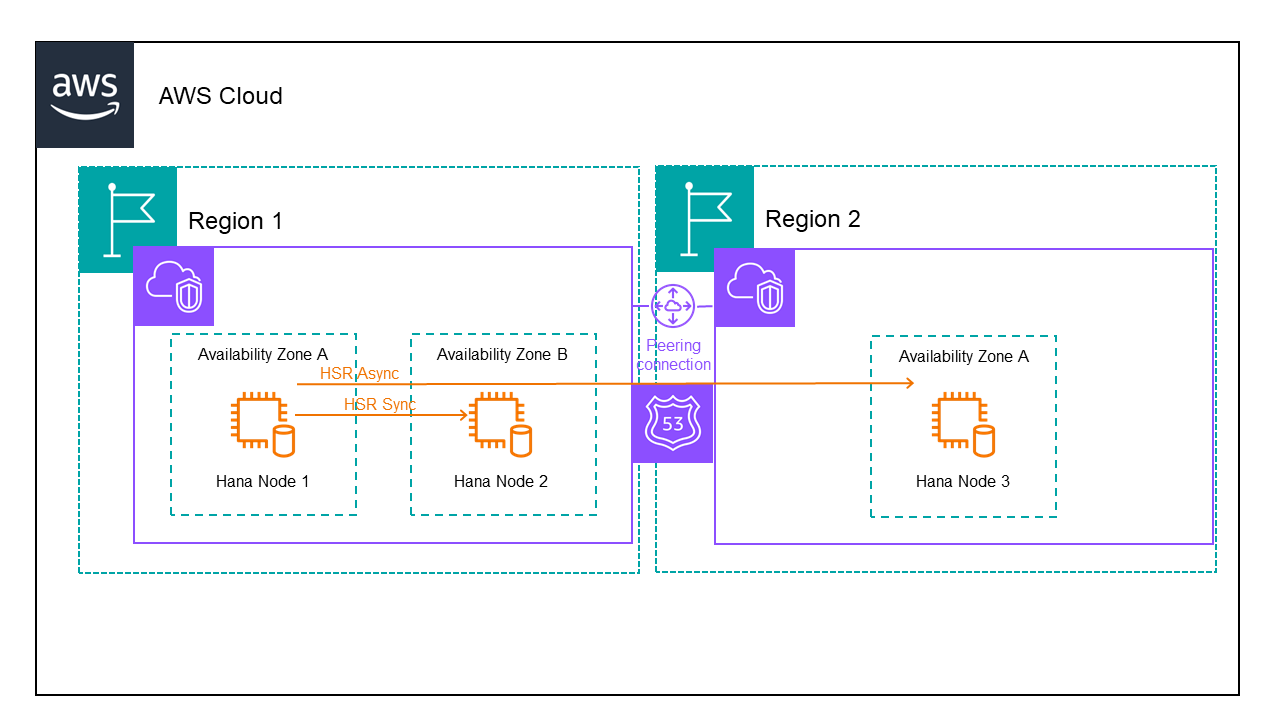
When setting up the storage use separate EBS volumes for /usr/sap, /hana/data, /hana/log and /hana/shared.
We have 2 VPCs one for each region. We need to setup peering between the VPCs and add routes to the routing table to ensure the servers can talk to each other. We also need to modify the security group to allow traffic between the servers.
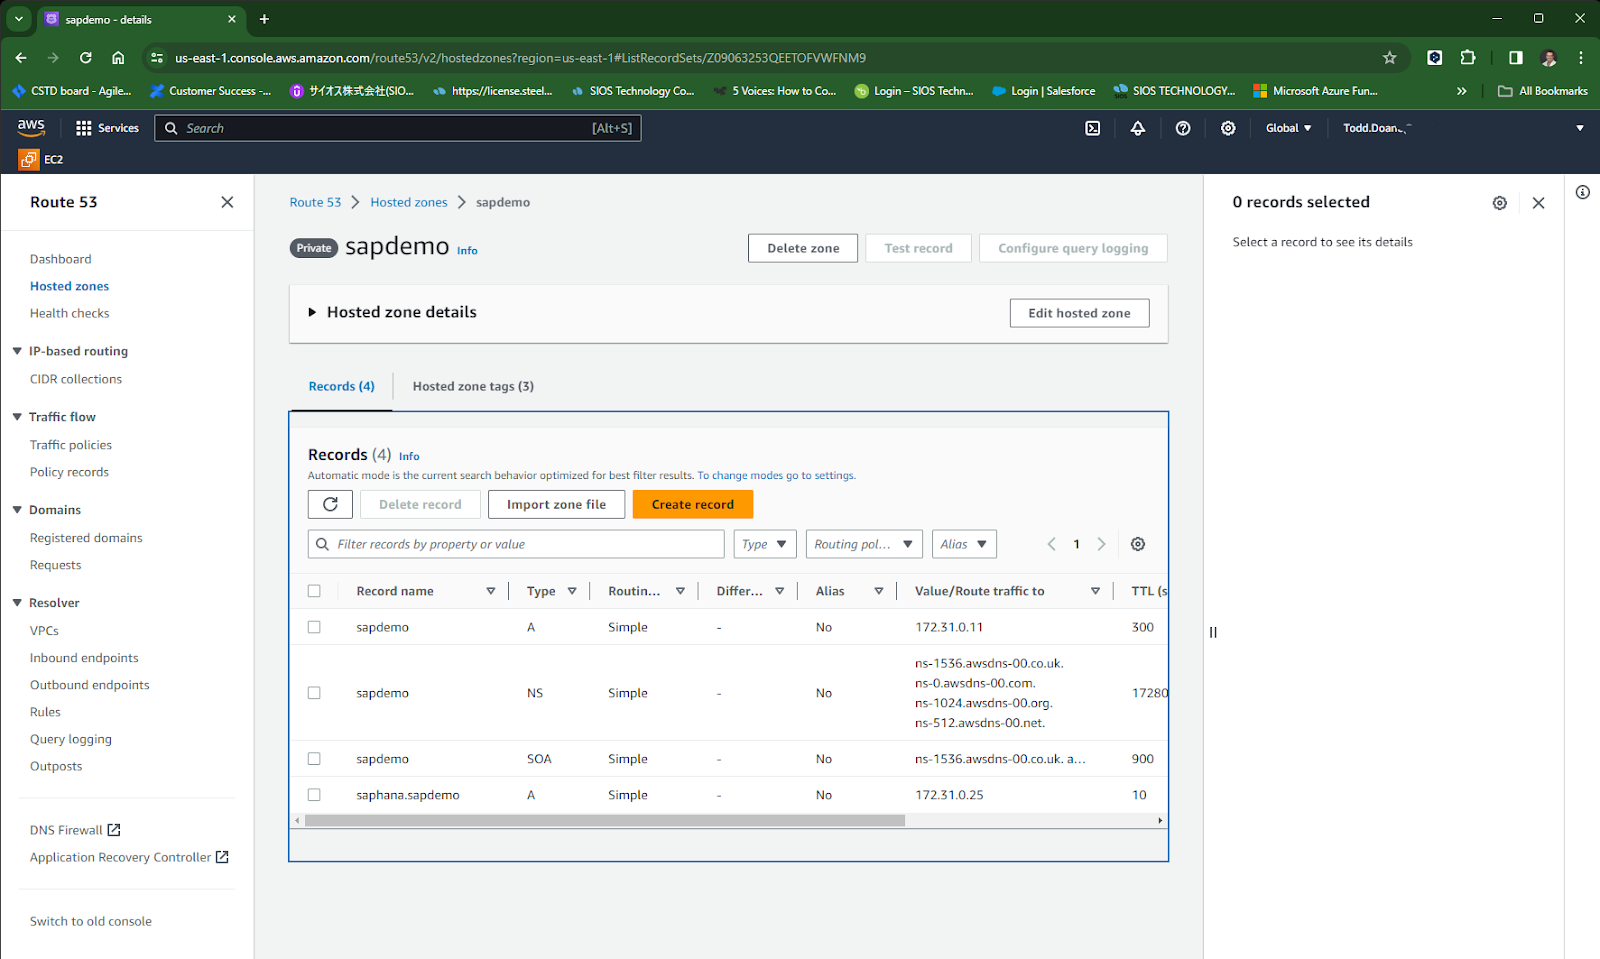
Finally we need to create a hosted zone containing both VPCs and add records for the domain and hostname we will use to communicate with the active HANA node.
Step 2: Installing and Configuring SAP HANA
Installation on Each Node
Install SAP HANA on each EC2 instance. Ensure that the versions are consistent across all nodes to avoid compatibility issues. This is by far the most challenging process.
Start by determining your installation settings. For mine, I am using the following:
SID: D11
- HANA Instance number: 11
- HANA db fqdn in Route53: saphana.sapdemo
- Node1 hostname: sapdemohana1
- Node2 hostname:sapdemohana2
- Node3 hostname:sapdemohana3
- Instance type: r5.4xlarge
Local Instance Storage:
- 30GB / (root volume)
- 15GB /usr/sap
- 60GB /hana/shared*
- 200GB /hana/data
- 200GB /hana/log
*For this installation, this is storage that is not shared between these HANA database servers. If you try to use shared storage, you will not be able to create an identical server because hdblcm will prevent the installation with an error about the SID and instance already existing.
Install the HANA server software on each node independently as if it were a standalone system. Make sure all required libraries are installed, for RHEL 8 they are in SAP note 2772999. You will need to make sure you create the symbolic link after installing compact-sap-c++-9-9.1.1-2.3.el7_6.x86_64.rpm by running: ln -s /opt/rh/SAP/lib64/compat-sap-++-10.so /usr/sap/lib/libstdc++.so.6
- yum install xorg-x11-server-Xorg xorg-x11-xauth -y #for the LifeKeeper GUI
- yum install nfs-utils
Create partitions, format storage and attach it. Create your swap file.
I create RSA keys on all my hosts and then allow the root ssh login between the hana nodes by adding the public key to the .ssh/authorized_keys file. This will make installation much easier.
Mount your HANA installation media volume.
- yum localinstall compat-sap-c++-10-10.2.1-11.el7_9.x86_64.rpm
- yum localinstall compat-sap-c++-9-9.1.1-2.3.el7_6.x86_64.rpm
- mkdir /usr/sap/lib
- ln -s /opt/rh/SAP/lib64/compat-sap-++-10.so /usr/sap/lib/libstdc++.so.6
- yum install compat-sap-c++-10 libatomic -y
Run hdblcm from the correct hana installation media directory. Once you have successfully installed HANA on all nodes you are ready for the next step.
System Replication Setup
You will need to take a backup prior to enabling HSR:
- su – <SID>adm [ie. su -d11adm]
- hdbsql -i <instance number>adm -u system -p <password> [ie. hdbsql -i 11 -u system -p “password123”]
- BACKUP DATA USING FILE(‘/usr/sap/<SID>/HDB<instance number>’) [ie. BACKUP DATA USING FILE(‘/usr/sap/D11/HDB11’)
Repeat the backup process above on all nodes.
Configure HANA System Replication on each node:
Start the HDB instance on primary HANA System if it isn’t already running: sapcontrol -nr <instance number> -function StartSystem HDB [ie: sapcontrol -nr 11 -function StartSystem HDB]
Start the HSR at primary site: hdbnsutil -sr_enable –name=<primary site name> [ie. hdbnsutil -sr_enable –name=sapdemohana1
Stop the HDB instance on secondary HANA System: sapcontrol -nr <instance number> -function StopSystem HDB [ie. sapcontrol -nr 11 -function StopSystem HDB]
In the additional HANA systems, backup the KEY and DAT files and copy the primary KEY and DAT files to the required locations:
- mv /usr/sap/<SID>/SYS/global/security/rsecssfs/data/SSFS_<SID>.DAT /usr/sap/<SID>/SYS/global/security/rsecssfs/data/SSFS_<SID>.DAT.BAK [ie. mv /usr/sap/D11/SYS/global/security/rsecssfs/data/SSFS_D11.DAT /usr/sap/D11/SYS/global/security/rsecssfs/data/SSFS_D11.DAT.BAK]
- mv /usr/sap/<SID>/SYS/global/security/rsecssfs/key/SSFS_<SID>.KEY /usr/sap/<SID>/SYS/global/security/rsecssfs/key/SSFS_<SID>.KEY.BAK [ie. mv /usr/sap/D11/SYS/global/security/rsecssfs/key/SSFS_D11.KEY /usr/sap/D11/SYS/global/security/rsecssfs/key/SSFS_D11.KEY.BAK]
- scp root@<primary node>:/usr/sap/<SID>/SYS/global/security/rsecssfs/data/SSFS_<SID>.DAT /usr/sap/<SID>/SYS/global/security/rsecssfs/data/SSFS_<SID>.DAT [ie. scp root@sapdemohana1:/usr/sap/D11/SYS/global/security/rsecssfs/data/SSFS_D11.DAT /usr/sap/D11/SYS/global/security/rsecssfs/data/SSFS_D11.DAT]
- scp root@<primary node>:/usr/sap/<SID>/SYS/global/security/rsecssfs/key/SSFS_<SID>.KEY /usr/sap/<SID>/SYS/global/security/rsecssfs/key/SSFS_<SID>.KEY [ie. scp root@sapdemohana1:/usr/sap/D11/SYS/global/security/rsecssfs/key/SSFS_D11.KEY /usr/sap/D11/SYS/global/security/rsecssfs/key/SSFS_D11.KEY]
Make sure the owner of the key and dat files are <SID>adm sapsys:
- [root@sapdemohana2 ~]# ls -l /usr/sap/D11/SYS/global/security/rsecssfs/data/
- total 12
- -rw-r–r– 1 d11adm sapsys 2960 Jan 3 22:19 SSFS_D11.DAT
- -rw-r–r– 1 d11adm sapsys 2960 Jan 3 22:15 SSFS_D11.DAT.BAK
Register the additional HANA systems with primary HANA system – must be done as the admin user:
- hdbnsutil -sr_register –name=<name of secondary HSR> –remoteHost=<primary host name of SAP HANA system> –remoteInstance=<remote instance number> –operationMode=<delta_datashipping | logreplay | logreplay_readaccess> –replicationMode=<sync | syncmem | async>
[ie. hdbnsutil -sr_register –name=sapdemohana2 –remoteHost=sapdemohana1 –remoteInstance=11 –operationMode=logreplay –replicationMode=sync]
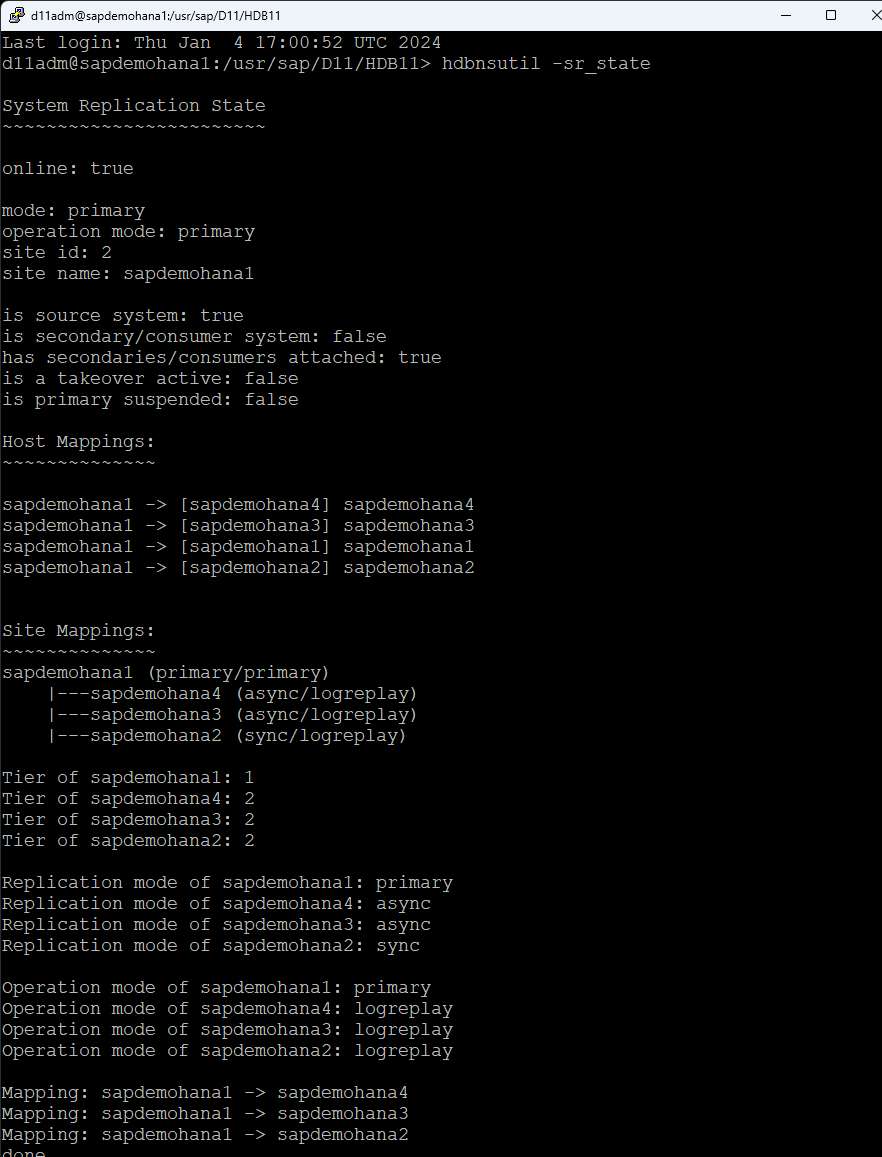
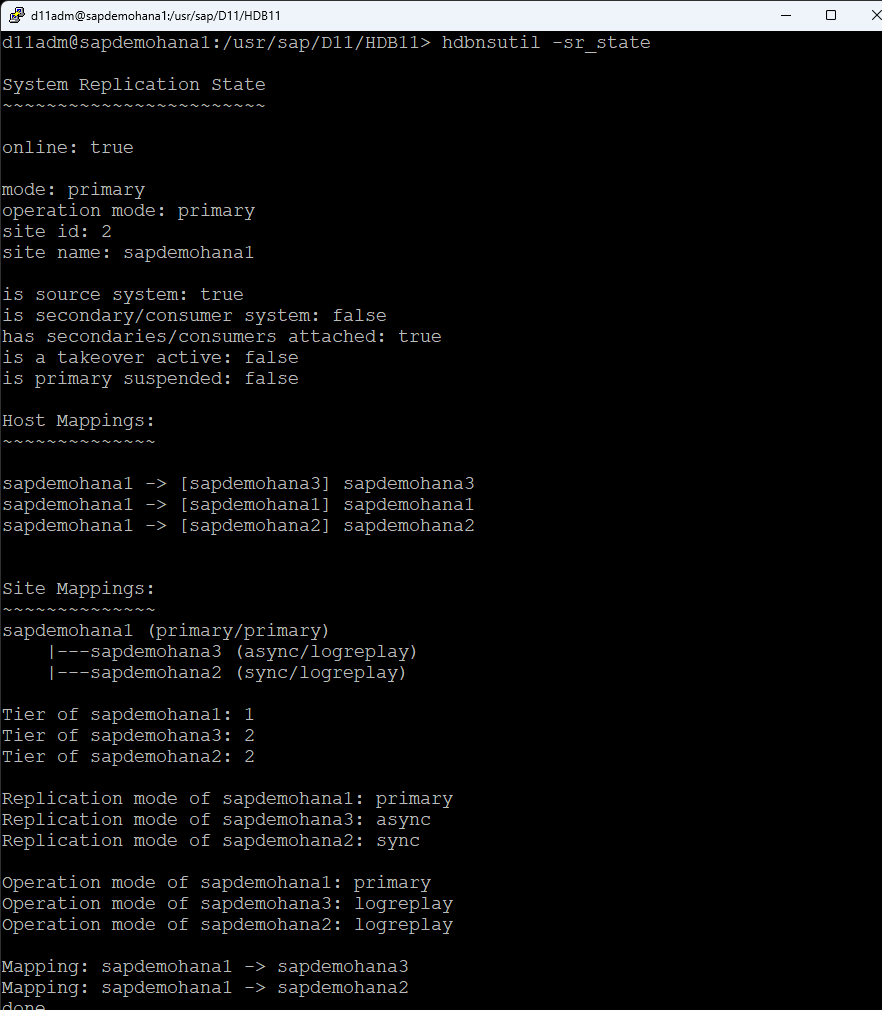
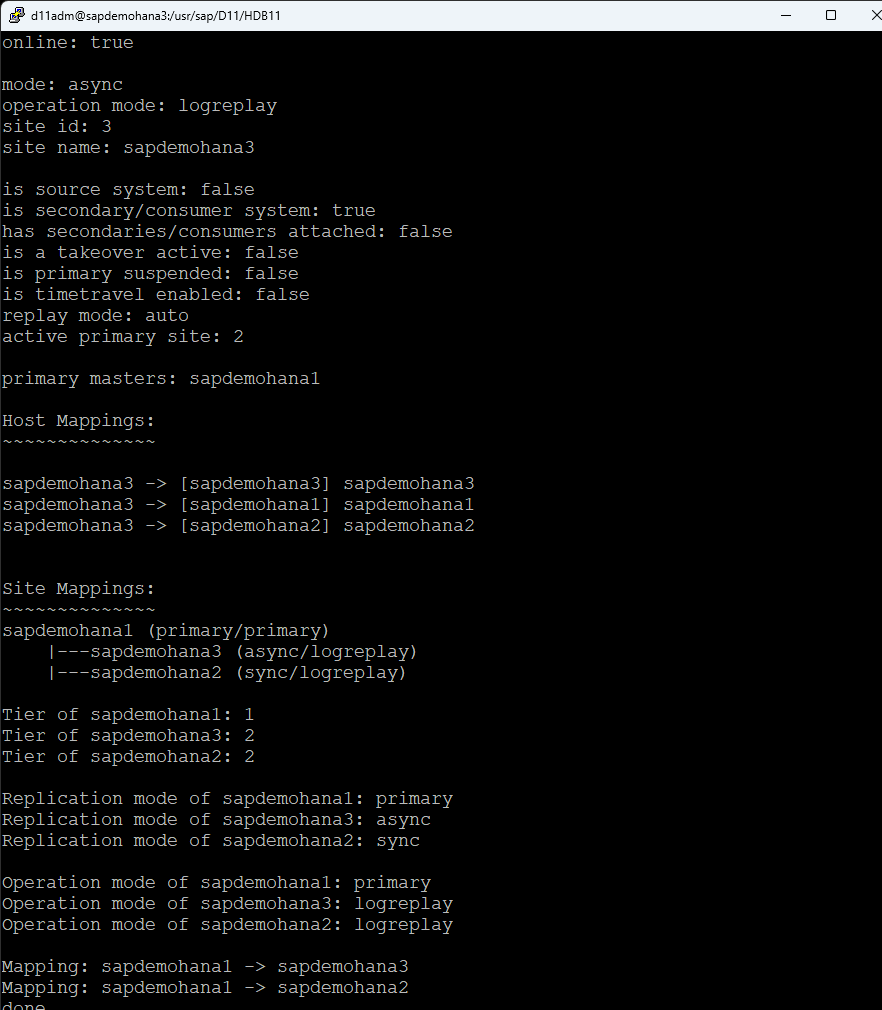
Check HSR status on all systems, run the following command as the admin user: d11adm@sapdemohana4:/usr/sap/D11/HDB11>hdbnsutil -sr_state
Once all systems are online you can move onto the next step.
Step 3: Installing SIOS LifeKeeper
AWS CLI Installation
Install AWS CLI and configure it with a key with the following permissions:
Route Table (backend) configuration:
- ec2:DescribeRouteTables
- ec2:ReplaceRoute
- ec2:DescribeNetworkInterfaceAttribute
- ec2:ModifyNetworkInterfaceAttribute
- Elastic IP (frontend) configuration:
- ec2:DescribeAddresses
- ec2:AssociateAddress
- ec2:DisassociateAddress
LifeKeeper Installation
Install SIOS LifeKeeper on each node. This involves running the installation script and following the setup wizard, which guides you through the necessary steps. For this installation, I am using the networking, Route53 ARK and the database, SAP HANA ARK along with the witness functions.
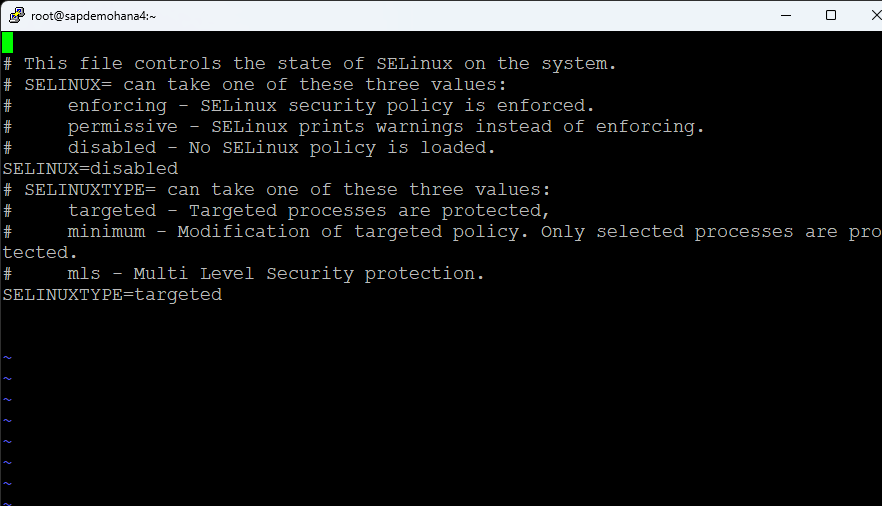
Edit the /etc/selinux/config file and disable selinux:
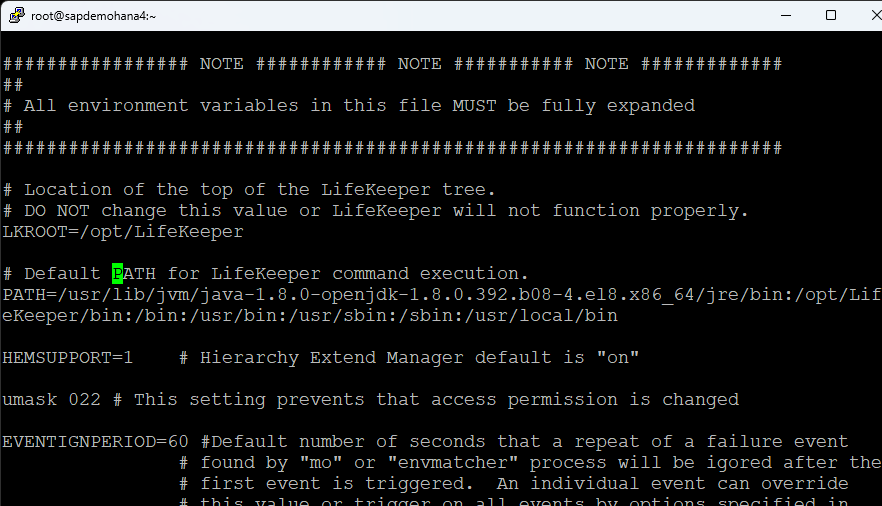
I also changed my hostname and edited the /etc/hosts file. Finally edit the /etc/default/LifeKeeper file and add /usr/local/bin to the PATH:
Change NOBCASTPING=1:
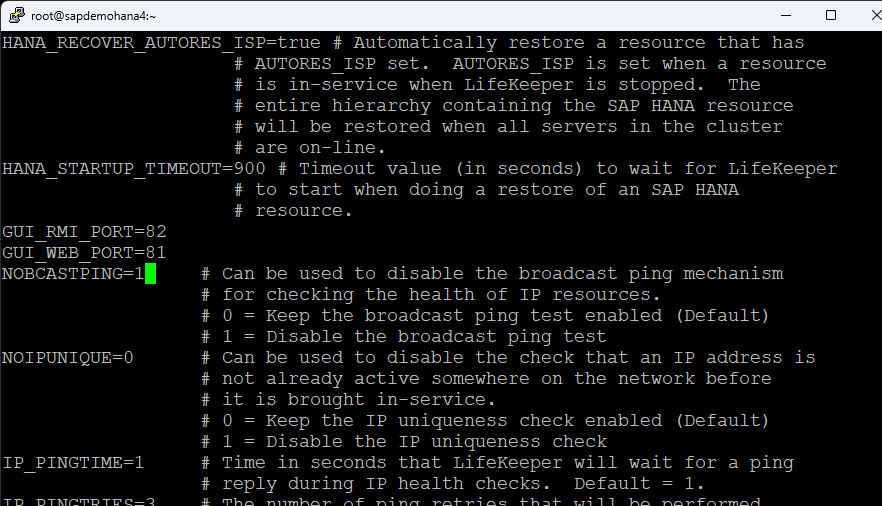
I also changed the QUORUM_LOSS_ACTION to osu:

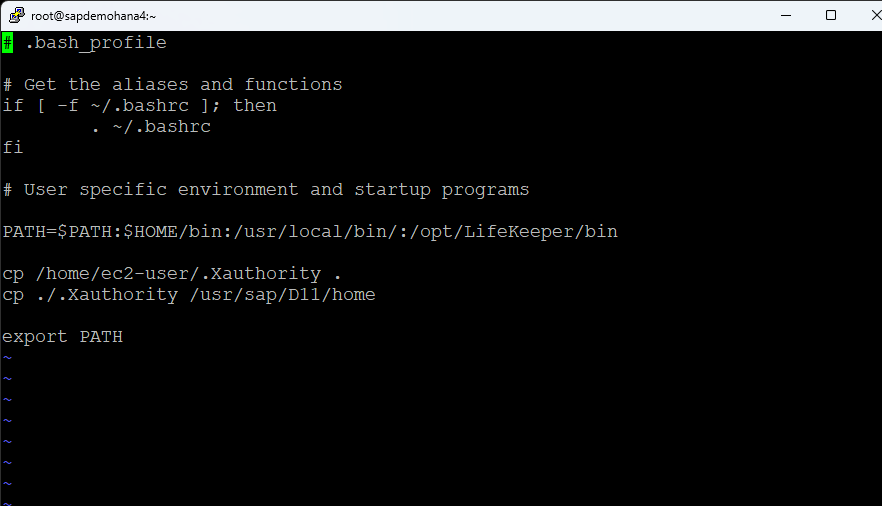
Make sure you have Xwindows working. I remove the cp alias from .bashrc and add /opt/LifeKeeper/bin and /usr/local/bin to my .bash_profile along with copy the ec2-users .Xauthority file to root and the <SID>adm home directory so that Xwindows will work:
I change the root password and reboot. Prior to launching the LifeKeeper GUI. make sure that HSR is online on all nodes and all nodes are registered:
Configuration
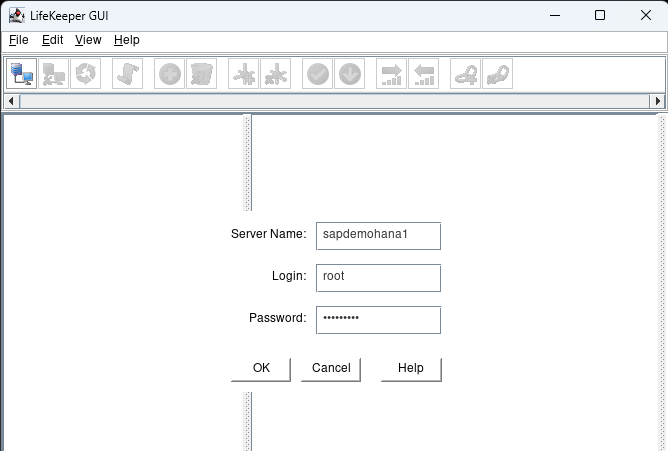
Launch the LifeKeeper GUI: lkGUIapp and login with the root user and password:
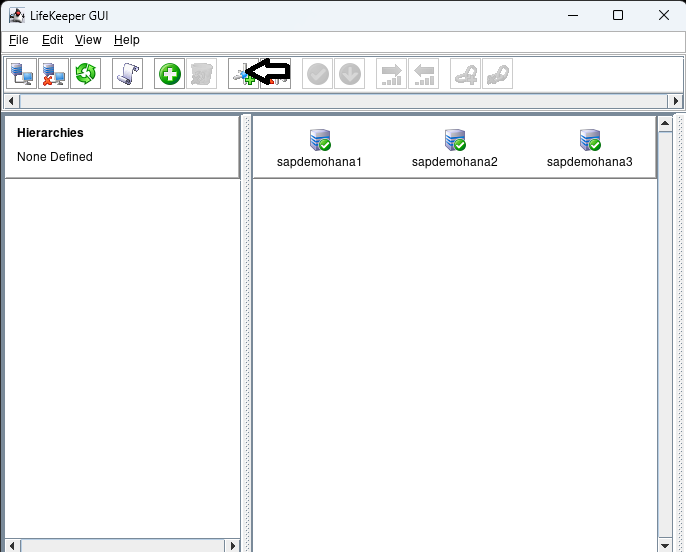
Click on the connect button to login to the additional nodes in the cluster:

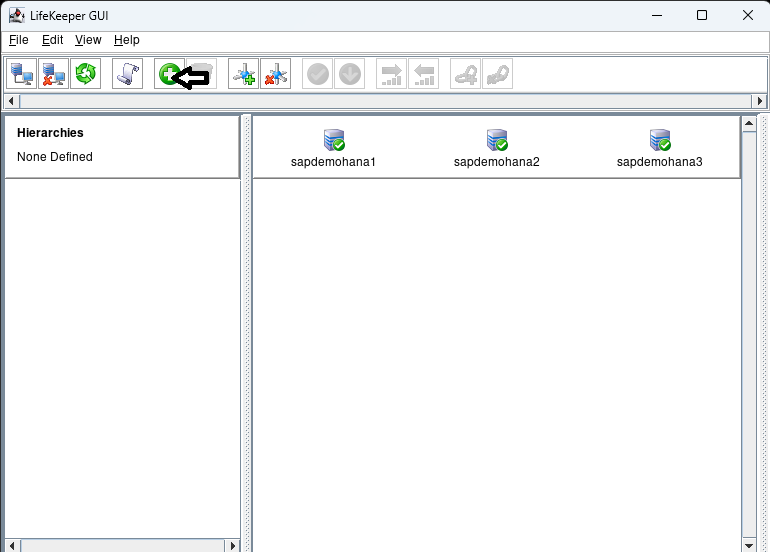
Once logged into all the nodes click on the Create Comm Path button:
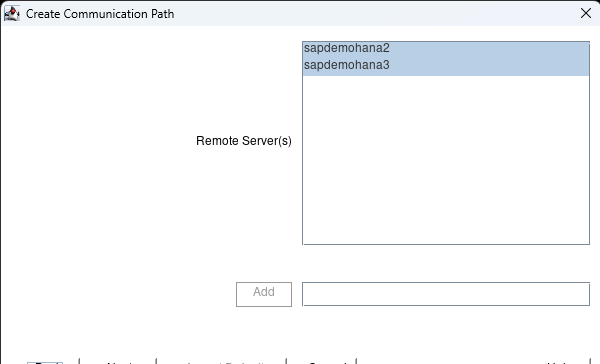
Hit next when it asks for the Local Server and then hold shift and select all the nodes:
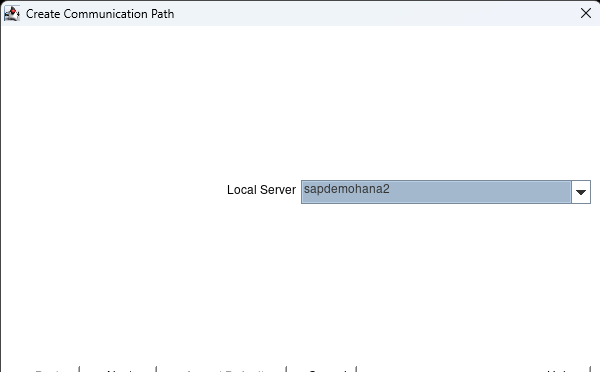
hit Accept Defaults and hit done when it is complete. Click on the Create Comm path button again and this time change to the second node:
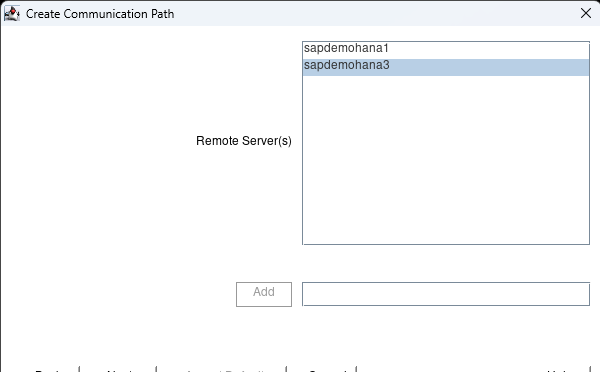
hit next and select the 3rd node:
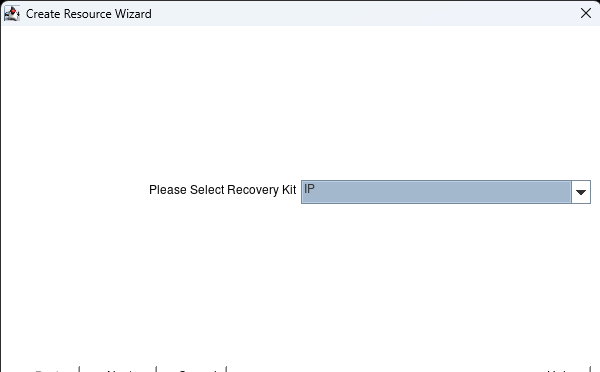
hit the next button until you can hit the Accept Defaults button. When complete hit done. Now click on the Create Resource Hierarchy button:
Select the IP kit and hit next:
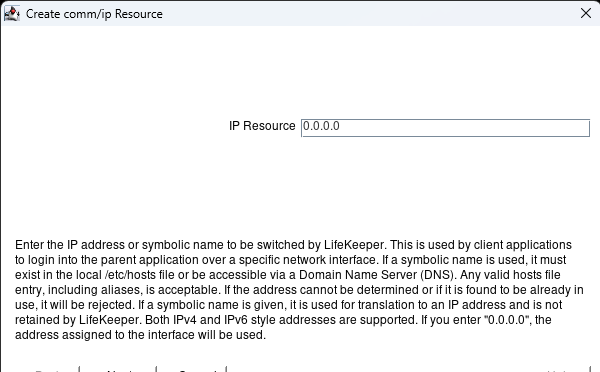
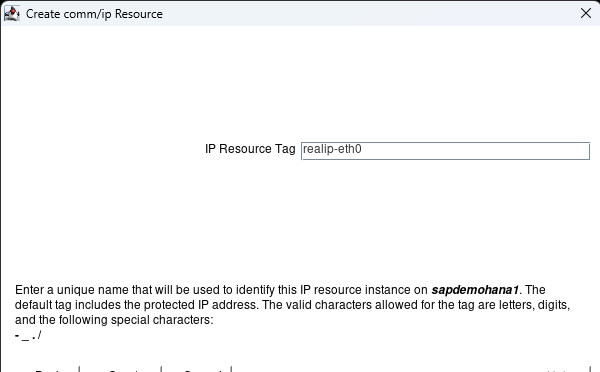
Hit next until you get to the IP resource page. Here enter 0.0.0.0 and hit next:
Hit next until you get to the Create button. Hit the Create button:
When it is complete hit next: Hit Accept Defaults with the Target Server showing the second node:
When complete hit Next Server:

Hit Accept Defaults with the 3rd node showing and when complete hit Finish:

Hit done:
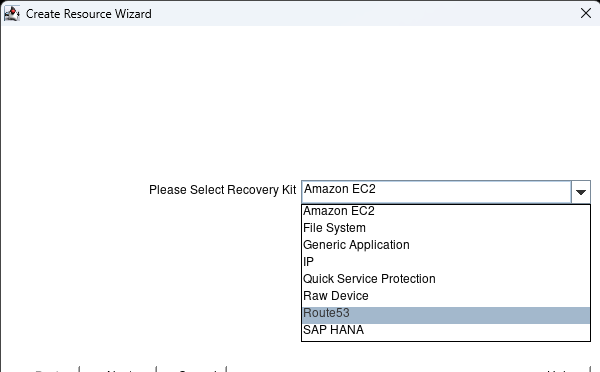
Now we have an IP resource we can add our Route53 resource which will change the dns entry to resolve the fqdn to the active nodes IP address. In this case saphana.sapdemo will resolve to the ip address of sapdemohana1 (172.31.0.25). Hit the Create Resource Hierarchy button to start the process:

Select Route53 and hit next:
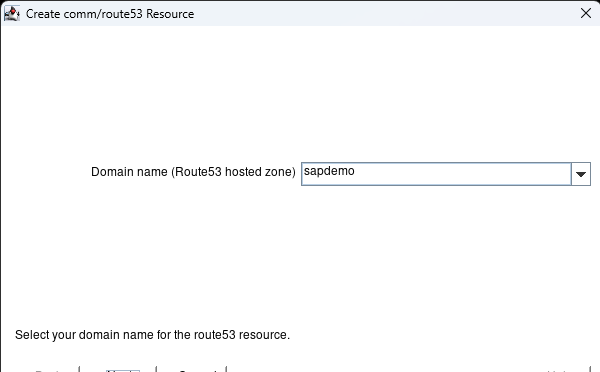
Keep hitting next until you get to the Domain Name. It should prepopulate with the active hosted zone name. Hit Next.
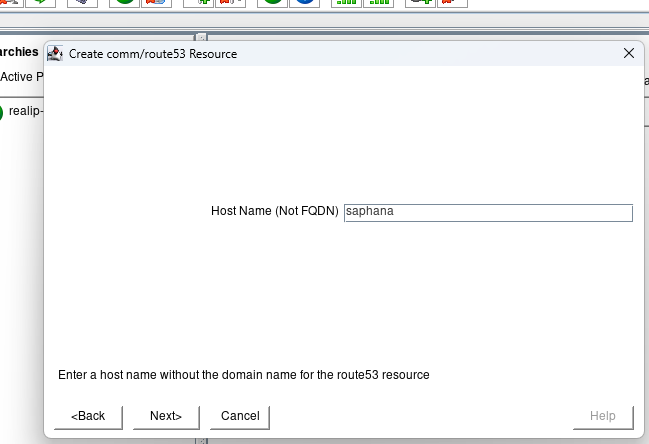
Enter the Host Name that everything will use to connect to the HANA database and hit next:
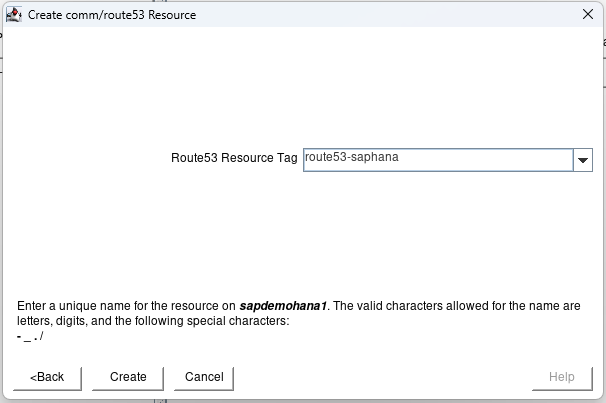
hit next until you get to the create button and click the create button. When done hit Next:
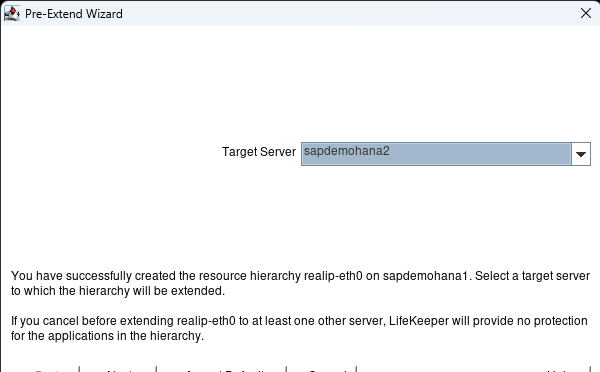
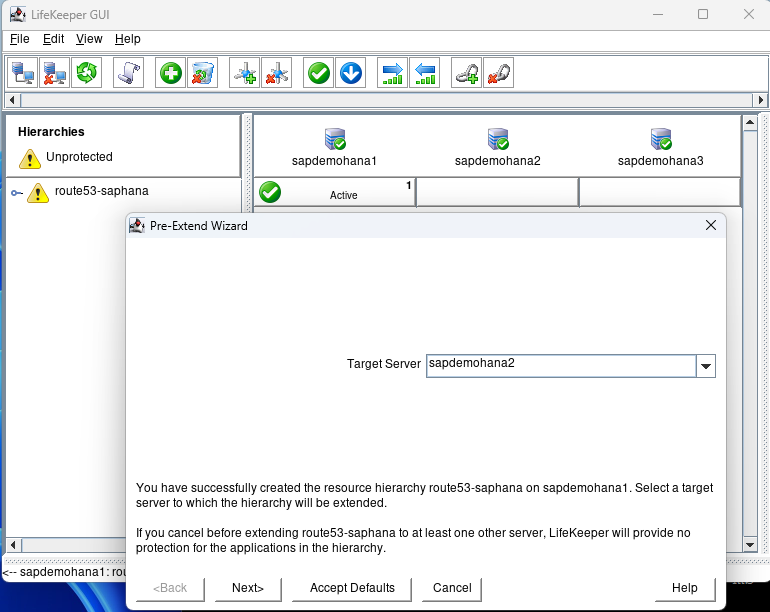
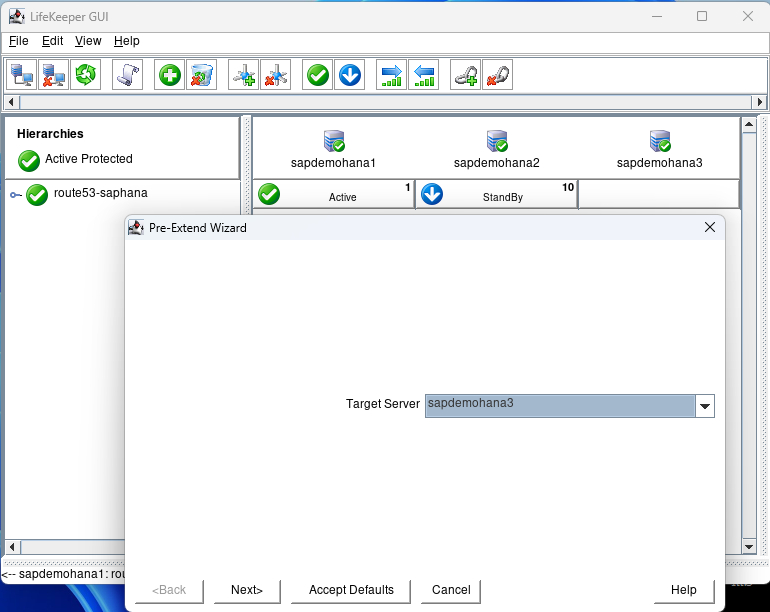
At the Pre-Extend Wizard hit Accept Defaults:
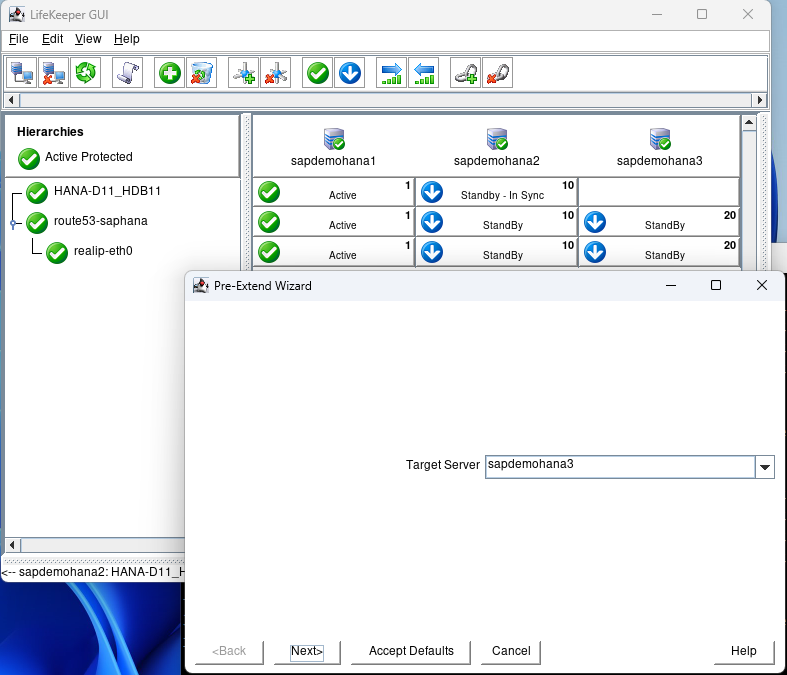
When done hit Next Server:
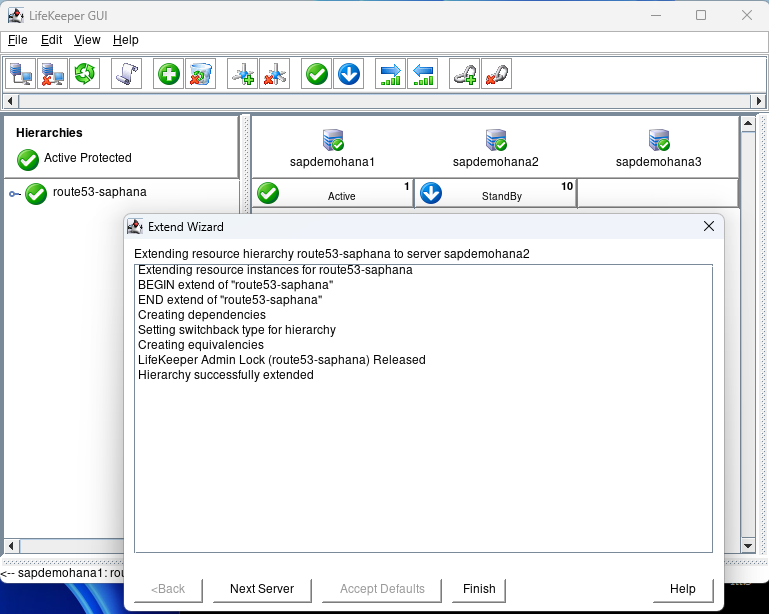
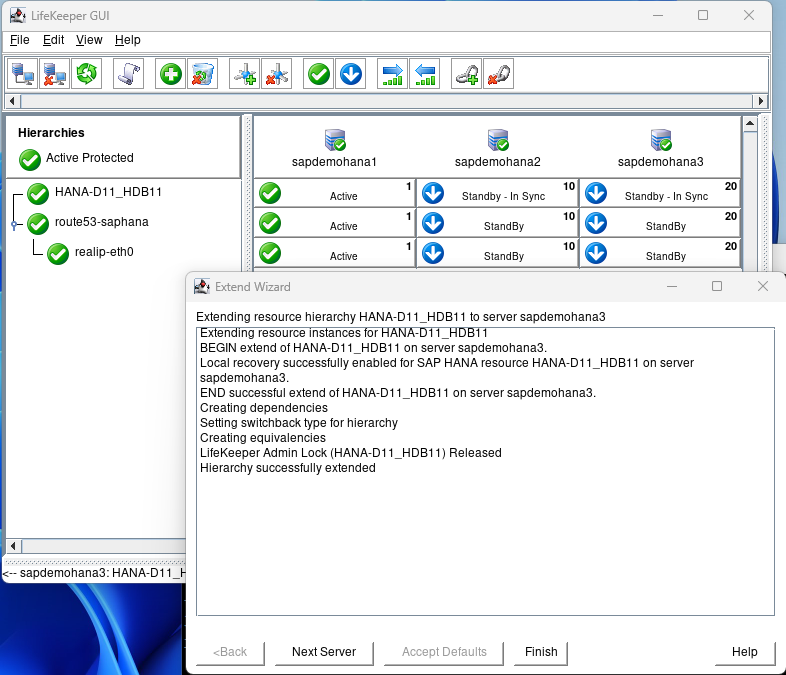
The Target Server will show the 3rd node. Hit Accept Defaults:
Hit Finish when done. Then hit Done. You can then expand the tree. Open a terminal session to the 2nd node and ping the fqdn for the HANA database [ie. ping -c3 saphana.sapdemo]
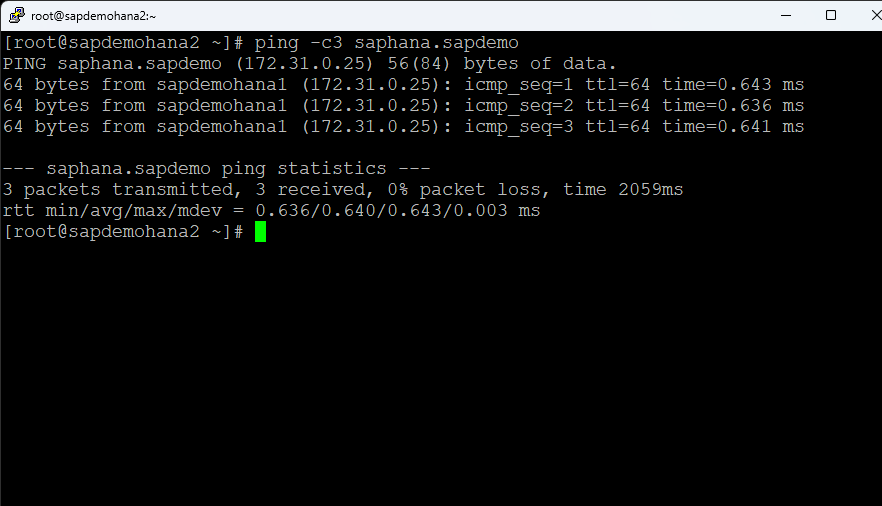
Right click on the top standby under sapdemohana3 and select In Service:
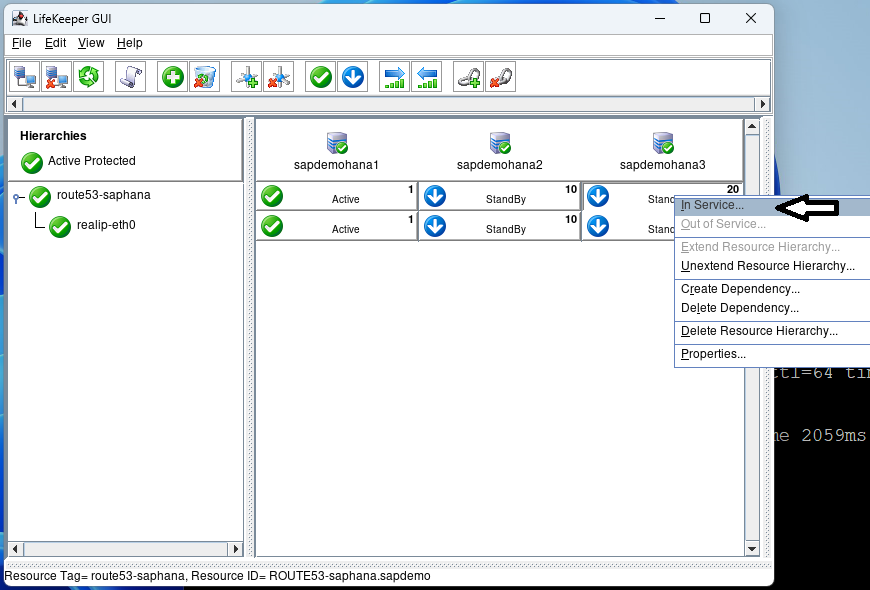
Hit In Service on the next screen and then hit Done when it is complete:
Go to the terminal window and repeat the ping test:
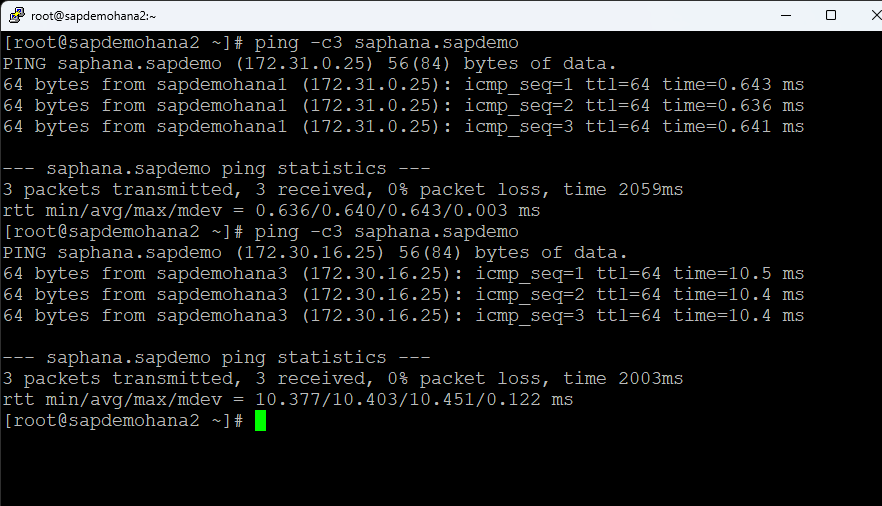
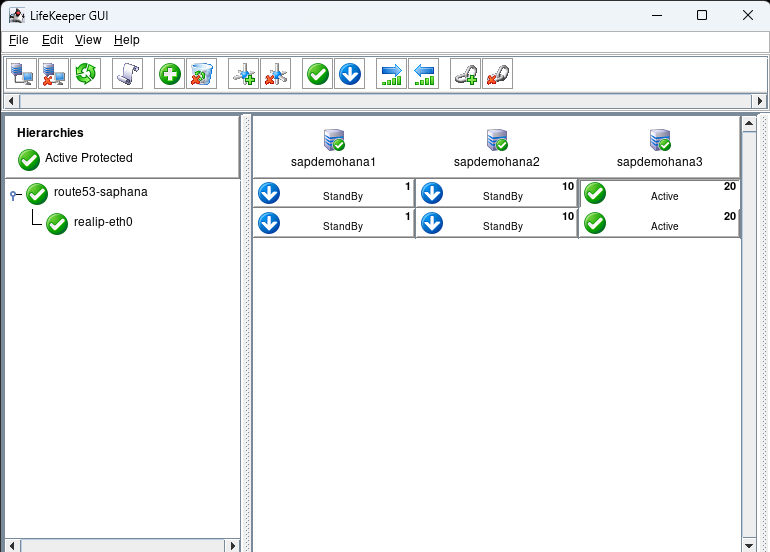
You can see that the hostname now resolves to sapdemohana3. Put sapdemohana1 back into service before moving onto the next step.
Step 4: Integrating SAP HANA with SIOS LifeKeeper
Resource Hierarchy Creation
Using the LifeKeeper GUI, create a resource hierarchy for SAP HANA on each node. This setup is crucial for managing failover and recovery processes. Make sure that HSR is active on node1 and the additional nodes are registered:

Click on the Create Resource button:
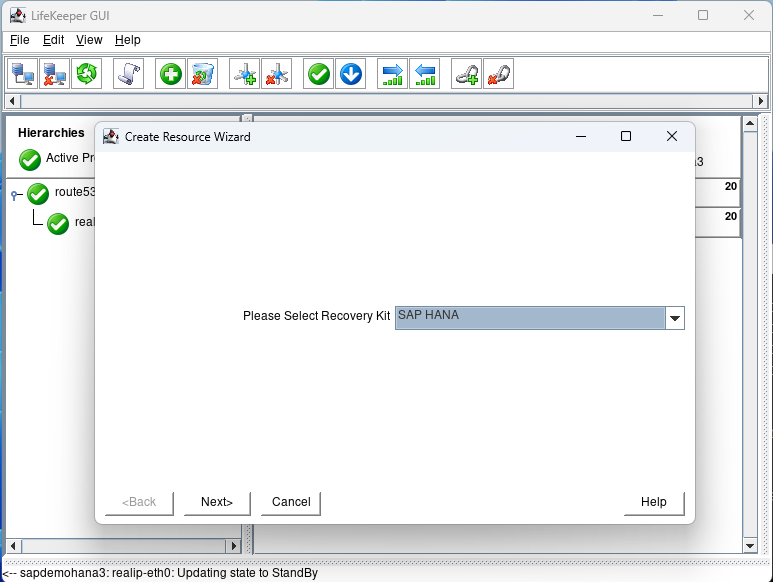
Select the SAP HANA recovery kit and hit next until you get to the IP Address screen:
Select none and hit next:
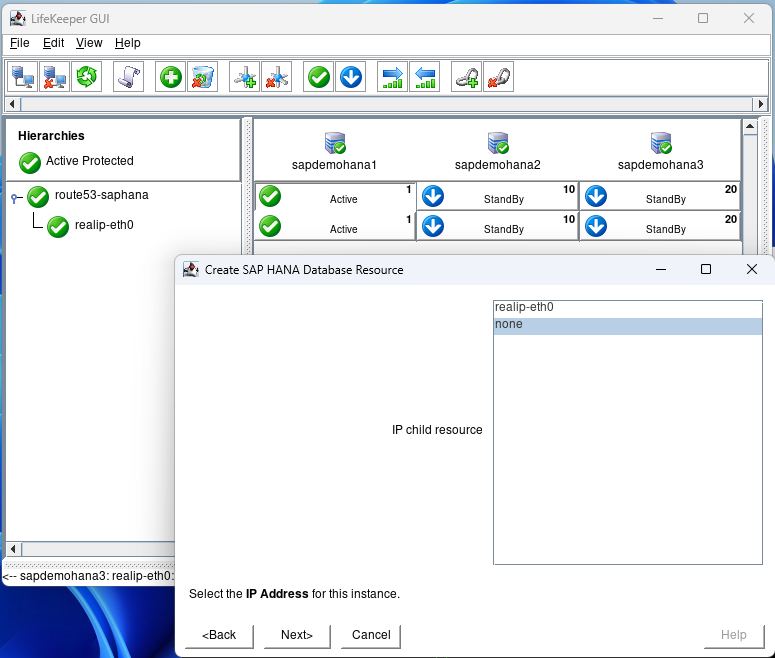
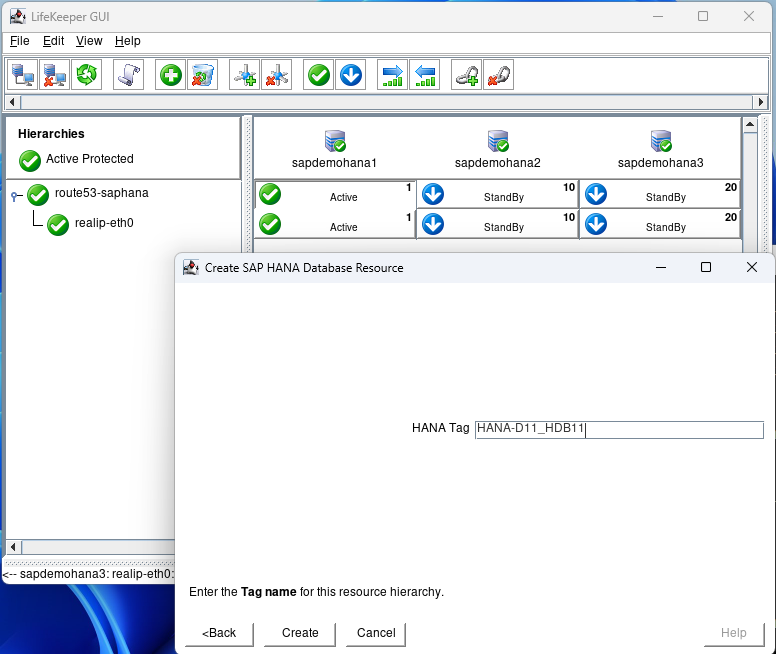
Hit next until you get to the Create screen and hit Create:
After creation hit next and then Accept Defaults for node2:
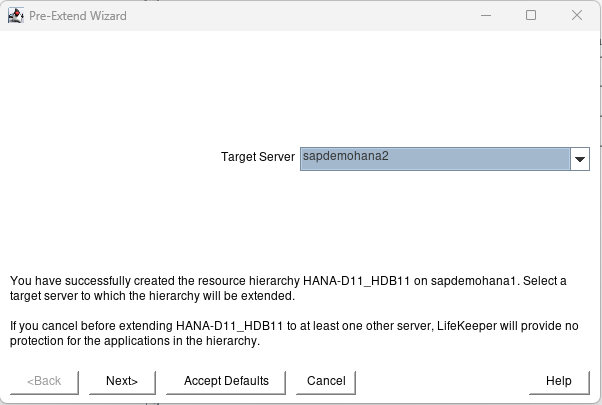
Again when node2 is complete hit Next Server and Accept Defaults:
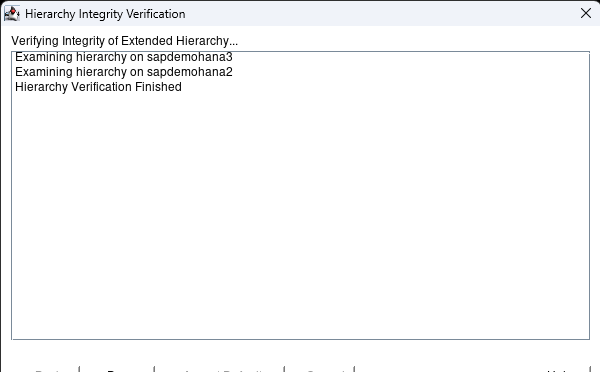
When complete hit Finish, then hit Done:
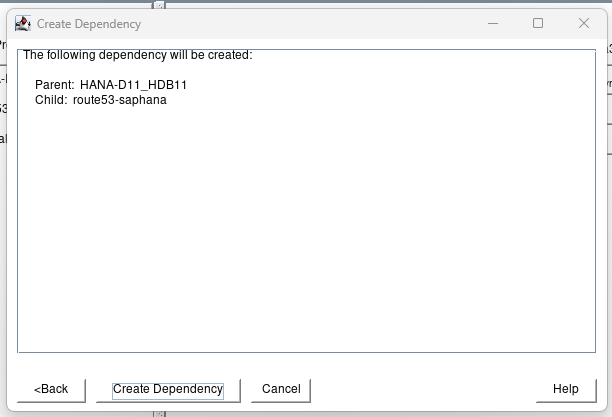
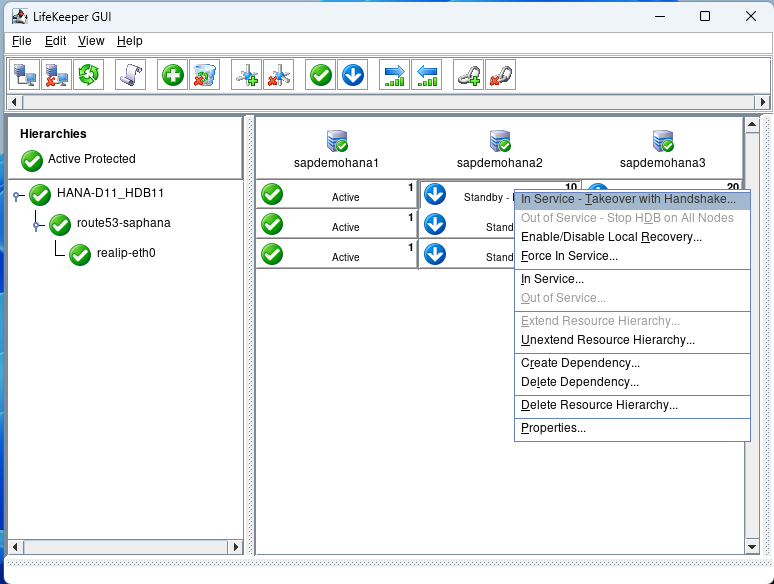
Right click on the Hana Hierarchy and select Create Dependency:
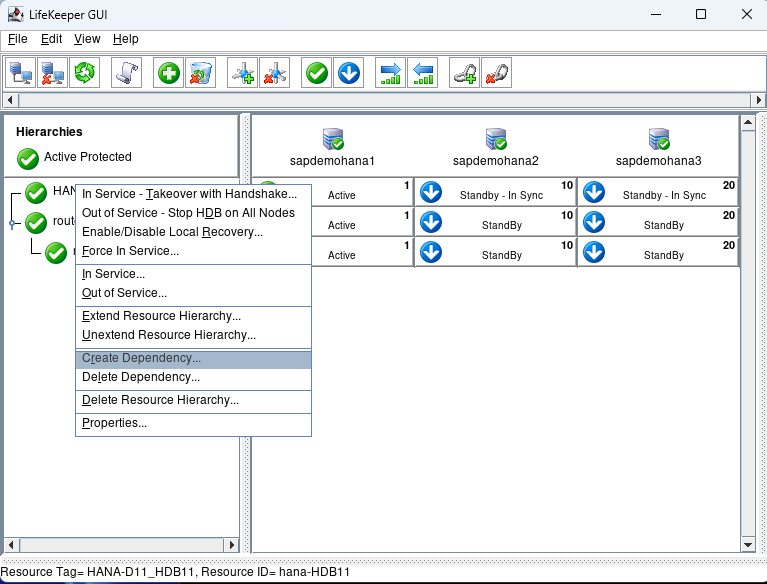
For the child Resource Tag select the route53 resource from the pulldown and hit next:
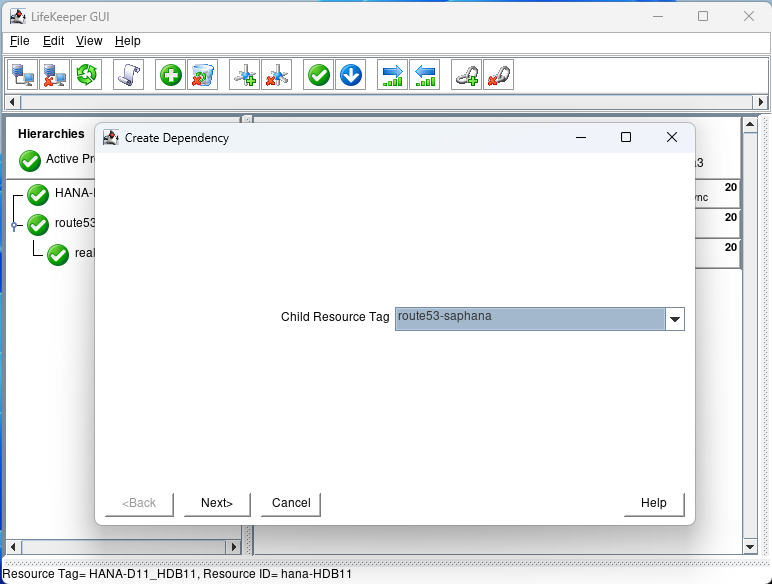
Click on Create Dependency:
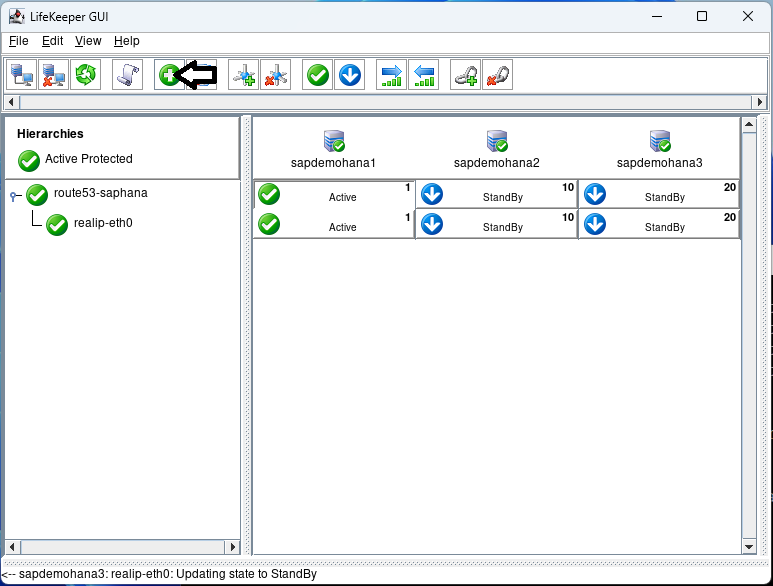
Click on Done. Then select view Expand Tree:
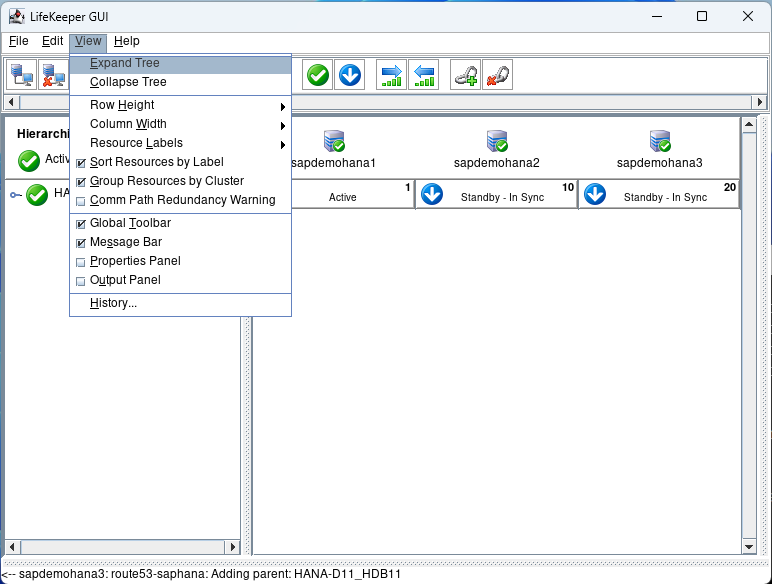
If everything is Green we are ready to test.
Step 5: Testing and Validation
Failover/Switchover Testing
Conduct thorough failover tests to ensure that the system correctly switches over to the secondary or tertiary node in case of a primary node failure. This testing should include scenarios like network failures, hardware issues, and software crashes.
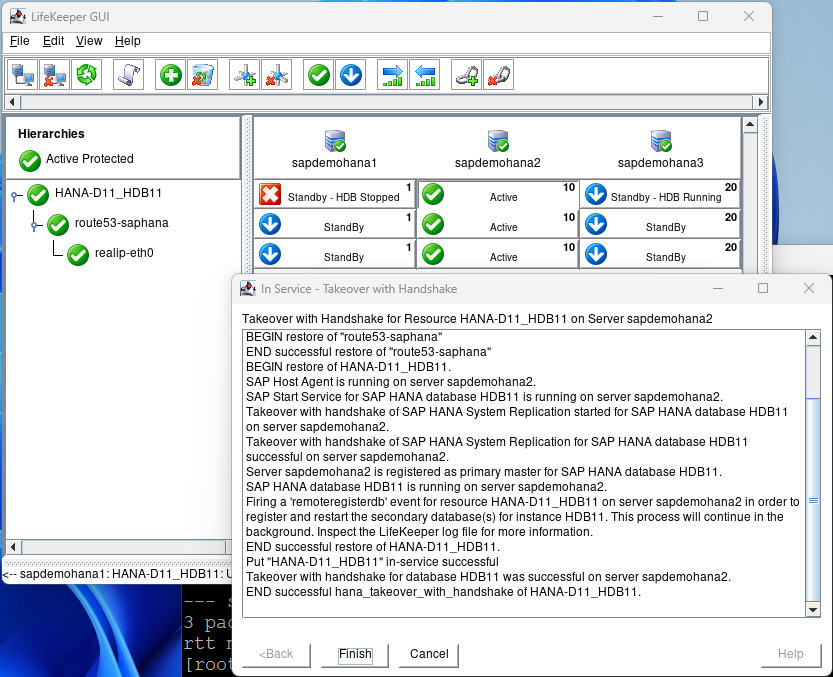
The first test we will perform is a switchover which would be used to perform maintenance activities or if you had a scheduled outage. Right click on the 2nd node and select In Service – Takeover with Handshake…
Hit Perform Takeover:
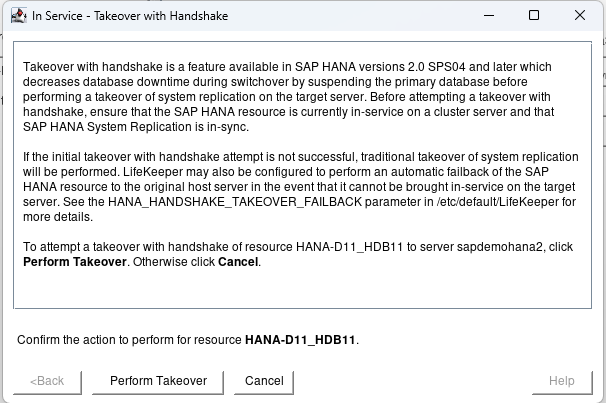
This test will switch to the 2nd node with the minimal downtime to users. When the 2nd node is up and running hit finish:
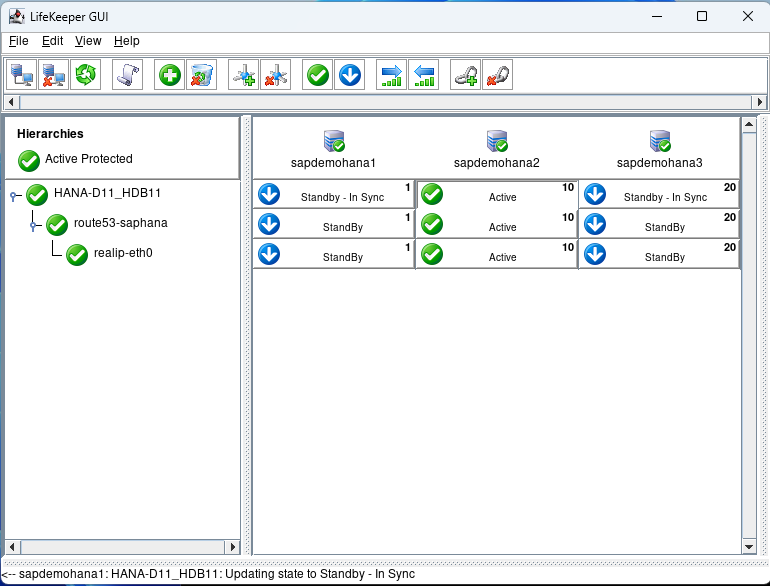
After some time node1 will come back into standby – In Sync.
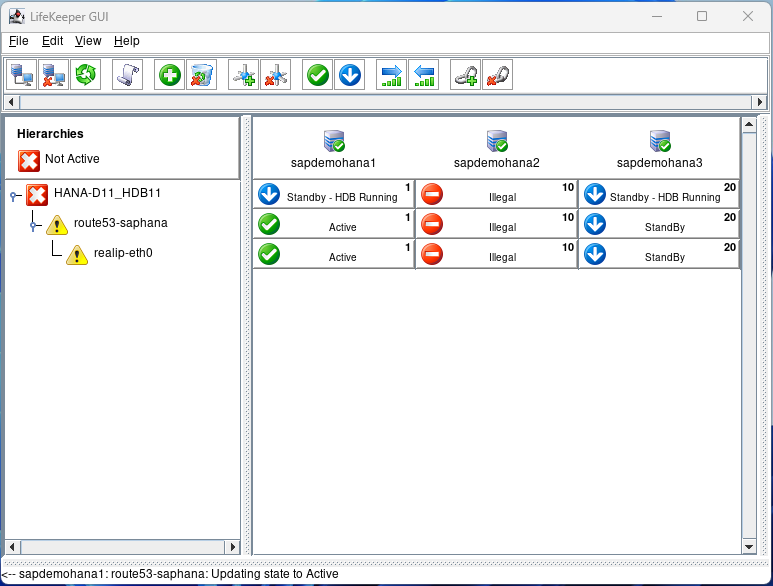
Now we can perform a failover test. Open a terminal to node 2 and type echo c > /proc/sysrq-trigger to simulate a system crash. You will see node 1 take over because it has the highest priority of 1:
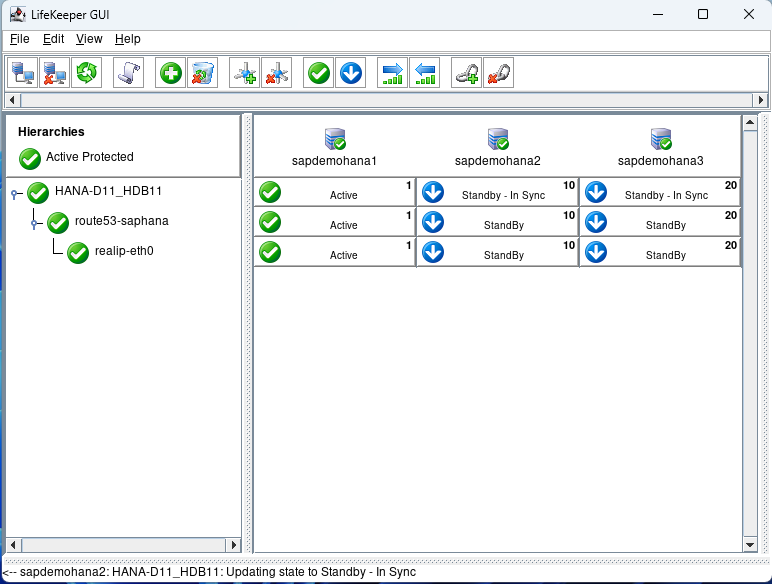
Eventually, everything will go back to normal:
There are a number of additional types of failure scenarios you may wish to test. Just ensure that your standby nodes are in sync prior to starting your testing.
Data Synchronization Verification
Verify that data is correctly replicating across all nodes. Consistent data across nodes is crucial for the integrity of the HSR setup.
Performance Monitoring
Regularly monitor the performance of the SAP HANA instances and the LifeKeeper setup. Check for any anomalies or issues that could indicate potential problems. Check the /var/log/lifekeeper.log file to ensure that everything is performing as expected. You may need to adjust the Heartbeat timer and number of heartbeats missed based on the network performance. These can be configured in the /etc/default/LifeKeeper file. The tunables are LCMHBEATTIME and LCMNUMHBEATS. You can also check the status of Lifekeeper from the command line with the command lcdstatus -q.
Conclusion
Setting up a 3-node HANA HSR cluster in AWS with SIOS LifeKeeper involves detailed planning and execution. By carefully following these steps, you can establish a robust, resilient, and highly available SAP HANA environment in the cloud, ensuring your critical data remains accessible and secure. SIOS LifeKeeper for Linux makes the administration, monitoring, and maintenance of SAP HANA quick and easy.